Base recipe: 12 slices
Your kitchen companion
Ingredients
Check off ingredients as you prepare them.
Follow the steps at your own pace.
Method
Crush biscuits: Place 1 ¾ cups (200 g) digestive biscuits into a food processor and pulse into fine crumbs. Texture should resemble dry sand with no large pieces.
Mix butter: Combine crumbs with 7 tbsp (100 g) melted unsalted butter until evenly coated. Mixture should hold shape when pressed.
Form crust: Press mixture firmly into a 20 cm (8-inch) springform pan using the back of a spoon or flat glass to create an even base.
Bake crust: Bake at 356°F (180°C), static oven, middle rack for 10 minutes. Crust is ready when lightly golden and fragrant.
Cool crust: Remove pan and let crust cool for 10 minutes to stabilize structure before filling.
Mix cream cheese: In a bowl, mix 21 oz (600 g) cream cheese until smooth and lump-free. Texture should be soft and spreadable.
Add sugar and salt: Add ¾ cup (150 g) sugar and ½ tsp (2 g) salt. Mix until fully combined with no visible granules.
Add eggs: Add 3 eggs (150 g) one at a time, mixing gently after each addition. Batter should remain smooth without visible air bubbles.
Add remaining ingredients: Add ¾ cup + 1 tbsp (200 ml) sour cream, 2 tsp (10 ml) vanilla extract, and 1 tsp (5 g) lemon zest. Mix until uniform.
Pour filling: Pour batter over cooled crust. Tap pan lightly on the counter to release trapped air.
Bake cheesecake: Bake at 320°F (160°C), static oven, middle rack for 50 minutes. Center should slightly wobble when gently shaken, edges set.
Cool in oven: Turn off oven and leave cheesecake inside with door slightly open for 60 minutes. This prevents rapid temperature change and cracking.
Chill cheesecake: Transfer to refrigerator and chill for at least 360 minutes (6 hours), preferably overnight. This step ensures full structure stabilization and clean slicing.
Extra technique, safety notes and details when you want to go deeper.
More tips & details
Mastering the Art of the Perfect Bake
Why this Easy Classic Cheesecake Recipe for Beginners Never Fails
Creating a Classic Cheesecake Recipe with a creamy texture and no cracks is the ultimate sign of a confident home baker. This recipe focuses on a stable, no-water-bath method that yields a luxurious, smooth interior by treating the batter like a delicate custard. By utilizing gentle, steady heat, we allow the dairy proteins to set perfectly without tightening or splitting, ensuring a smooth baked cheesecake with a stable creamy center every single time.
Achieving a Professional Clean Slice and Firm Edges
A truly successful creamy cheesecake easy step by step process is revealed the moment you slide your knife through it. You are looking for clean, defined edges with absolutely no collapse or separation from the crust. When chilled properly, the interior remains velvety and dense—the hallmark of a cheesecake with creamy texture and no cracks. The slice should stand tall and uniform, proving that the mixture stabilized beautifully during the cooling phase.
The Secret to a Smooth and Dense Interior
The key to this simple baked cheesecake recipe at home is temperature control. By maintaining a low, steady oven temperature of 320°F (160°C), we ensure the proteins coagulate gradually. This prevents trapped air from expanding too quickly, which is the main culprit behind surface fractures. The result is a baked cheesecake with a creamy texture, no visible air pockets, and a gorgeous, flat surface.
- Even structure: A uniform density that prevents sinking.
- Fine crumb: A silky interior without distracting bubbles.
- Stable surface: A flat, pale top that signals a perfectly controlled bake.
Comparing Textures Across the Cheesecake World
Technique defines the soul of a dessert. While a Japanese Cheesecake relies on whipped egg whites for an airy, souffle-like feel, and a Basque Burnt Cheesecake uses high heat for a fluid center, this recipe finds the "Golden Ratio". It sits right in the middle: sturdy enough to slice perfectly, yet creamy enough to melt on the tongue.
Why this Method is Beginner-Safe and Reliable
You don't need fancy equipment to achieve elite results. Before baking, your batter should be thick, glossy, and free of lumps. Because we control the air incorporation, you will see minimal rise in the oven, which is exactly what we want to avoid cracks. This cheesecake without cracks and no water bath is designed to be repeatable and stress-free, even if it is your very first attempt.
Chef PEKIS’s Pro-Tips for Success
To ensure your cheesecake is a masterpiece, follow these essential "Chef's Rules":
- Room Temperature is King: Ensure your 21 oz (600 g) of cream cheese and eggs are at room temperature to avoid a lumpy batter.
- Don't Overmix: Once the eggs are in, mix gently to avoid whisking in excess air.
- The Oven Staycation: Never open the door during the bake. Let the cake cool inside the oven with the door cracked to prevent structural shock.
Storage and Making the Perfect Make-Ahead Dessert
Cheesecake is the ultimate make-ahead luxury because the flavor and structure actually improve after resting overnight. Store your cake in the refrigerator at 40°F (4°C) for up to 4 days, ensuring it is covered to maintain its moisture. For long-term storage, you can freeze it for up to 2 months, making it the perfect stress-free finish for any dinner party.
Served slightly chilled with a clean, stable cut
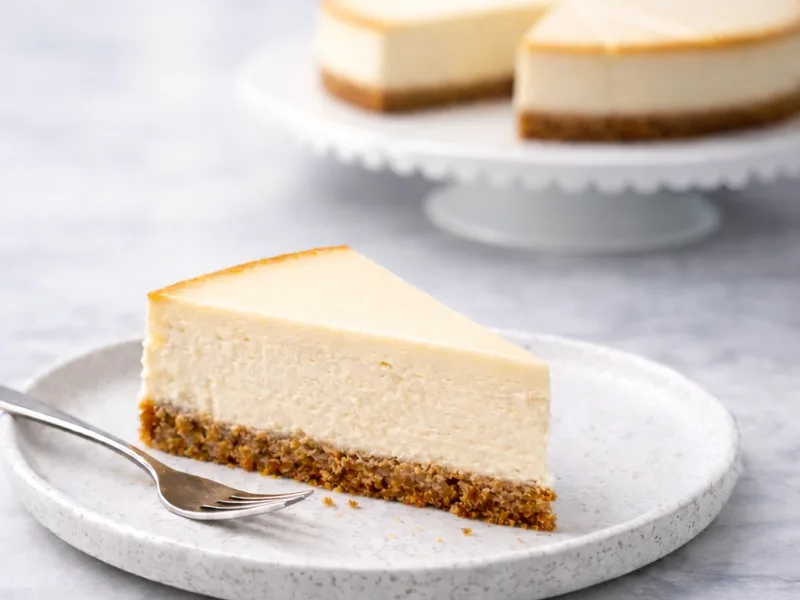
A classic cheesecake recipe in this format is a baked version without any topping or glaze, presented as a clean slice with defined layers. The surface remains smooth, and the interior shows a uniform pale color from edge to center. The slice holds its shape on the plate, with a firm base and a creamy middle that does not collapse under its own weight.
The first cut reveals the structure clearly. The knife moves through with minimal resistance, leaving a straight edge without crumbling. The texture feels dense but soft, with no visible air pockets. A slight sheen on the cut surface indicates balanced moisture, confirming that the filling has set correctly.
Fits naturally into dessert or afternoon service
Served after a meal, the portion sits comfortably without feeling heavy. The balance between richness and mild acidity keeps the flavor neutral enough to follow a wide range of dishes. It works equally well as a plated dessert or as part of a shared table where slices are served directly from the pan.
In an afternoon setting, the slice pairs well with coffee or tea, where the creamy texture contrasts with the drink’s warmth. The smooth interior and compact form allow it to be handled easily, making it suitable for casual serving without additional elements.
Questions
Is classic cheesecake recipe gluten-free or can it be made gluten-free?
Gluten is present only in the biscuit crust, so the filling remains naturally gluten-free. The structure depends on eggs and dairy, not flour, so texture stays stable after substitution. Using gluten-free biscuits with similar fat absorption ensures the base holds together and does not crumble. Pressing firmly creates a compact layer that prevents moisture transfer from the filling.
Why does classic cheesecake crack on top after baking?
Cracks form due to rapid temperature changes and excess air in the batter. When overheated, proteins tighten quickly and pull apart, creating visible splits. Gentle mixing reduces air pockets, and steady baking temperature prevents expansion shock. The surface remains smooth when cooling happens gradually inside the oven. Chef tip: Always switch off the oven and leave the door slightly open—this prevents sudden contraction and keeps the top intact.
How to make classic cheesecake creamy and not dense or dry?
A creamy result depends on moderate heat and fat balance during baking. High heat forces moisture out, creating a dry texture, while controlled baking keeps water bound within the structure. The batter should be smooth and slightly thick before baking, with no foam. Proper chilling allows fats to stabilize and creates a dense but creamy mouthfeel.
Why is classic cheesecake still soft in the center after baking time?
The center stays soft when internal temperature has not reached full protein coagulation. A slight wobble is correct, but excessive movement means underbaking. Residual heat continues cooking after the oven is turned off, completing the structure. Cutting too early disrupts the internal matrix before it fully sets. Chef tip: Gently shake the pan—if only the center moves like soft gel, the cheesecake is correctly baked.
Does overmixing ruin classic cheesecake texture and cause cracks?
Overmixing traps air inside the batter, which expands during baking and collapses later. This creates cracks and uneven density. A properly mixed batter looks dense, smooth, and slightly glossy. Reducing mixing speed after adding eggs prevents aeration and keeps the structure compact.
Why does cheesecake crust turn soggy after baking in home ovens?
A soggy crust results from insufficient pre-baking and weak compression. Moisture from the filling seeps into a loose base, softening it. A firm, pre-baked crust forms a barrier that resists absorption. Butter solidifies during cooling, helping maintain a crisp structure under the creamy filling. Chef tip: Press the crust firmly using a flat glass to create an even, compact base that holds its shape after baking.
Recivelle · /recipe/ultimate-classic-cheesecake-recipe