Base recipe: 8 slices
Your kitchen companion
Ingredients
Check off ingredients as you prepare them.
Follow the steps at your own pace.
Method
Melt dairy base: Place the cream cheese (9 oz / 250 g), unsalted butter (3.5 oz / 50 g), and whole milk (⅖ cup / 100 ml) in a heatproof bowl. Set over gently simmering water and heat, stirring constantly, until completely smooth and fluid with no lumps. Remove from heat.
Incorporate yolks: Add the egg yolks (4 large / 80 g) to the warm mixture and whisk until fully blended and glossy.
Add dry ingredients: Add the cake flour (½ cup / 60 g), cornstarch (2½ tbsp / 20 g), and fine salt (¼ tsp / 1 g). Mix gently until the batter is smooth and thick but pourable, with no visible dry pockets.
Flavor the batter: Stir in the lemon juice (1 tbsp / 15 ml) and vanilla extract (1 tsp / 5 ml) until evenly distributed.
Whip the meringue: In a clean bowl, whip the egg whites (4 large / 140 g) while gradually adding the granulated white sugar (½ cup + 2 tbsp / 120 g). Whip to medium-stiff peaks; the foam should hold its shape but still bend slightly at the tip.
Fold carefully: Add one-third of the meringue to the batter and fold gently with a spatula to loosen it. Fold in the remaining meringue in two additions, using slow, sweeping motions. Do not stir; the batter should look airy and uniform.
Prepare the pan: Line a round 8-inch / 20 cm cake pan with parchment paper on the base and sides. Pour the batter into the pan and tap lightly once to release large air pockets.
Bake in water bath: Place the cake pan into a larger roasting pan. Pour hot water into the outer pan until it reaches 1–1¼ inches (2–3 cm) up the sides of the cake pan. Bake at 160 °C (320 °F), conventional oven setting, on the lower-middle rack for 60 minutes. The surface should remain pale and matte.
Stabilize in oven: Turn off the oven, open the door slightly, and leave the cake inside for 30 minutes. This gradual temperature drop prevents shrinkage and cracking.
Cool completely: Remove the cake from the oven and let it cool at room temperature for 60 minutes. The cheesecake should feel elastic to the touch and hold its shape when sliced.
Extra technique, safety notes and details when you want to go deeper.
More tips & details
A fluffy Japanese cheesecake with a stable, airy crumb
The interior sets light and elastic without drying
Japanese cheesecake belongs to a small group of baked desserts where structure is created more by air and moisture control than by density. The goal here is a fluffy Japanese cheesecake that rises evenly, stays pale, and settles into a fine, springy crumb once cooled. You’ll know the batch is on track when the surface looks smooth and matte rather than glossy, and the center responds with a gentle resistance instead of a wobble.
This preparation suits cooks who want a clear visual path from bowl to oven. The batter is fluid but not thin, and its behavior during baking is predictable when heat is kept moderate. The finished slices hold clean edges while remaining soft, which makes the result suitable for both plated service and buffet-style cutting.
The bake remains moist because steam controls heat flow
The defining mechanism behind this style is controlled steam. A humid oven environment limits surface dehydration while heat travels slowly to the center. That balance allows proteins to set before moisture escapes, which is why the crumb stays uniform rather than collapsing into layers. When done correctly, the cake finishes baking internally before the exterior develops color, preserving the light cotton cheesecake character.
Compared with high-heat cheesecakes such as Basque Burnt Cheesecake, this method favors restraint. The absence of aggressive browning is intentional and directly responsible for the pale surface and tender bite.
Slices serve cleanly once the structure stabilizes
Serving works best after full cooling, when the interior has finished redistributing moisture. At that point, the crumb no longer clings to the knife, and each portion separates with minimal pressure. This state matters when the cake is meant to be portioned into equal slices rather than spooned or scooped.
If you are familiar with chilled formats like No-Bake New York Cheesecake Extra Creamy Classic, expect a different cue here: firmness comes from set proteins, not refrigeration. The texture should feel light but complete, not fragile.
Flavor stays balanced through restrained sweetness
The flavor profile remains neutral by design. Mild dairy notes lead, supported by subtle acidity and restrained sweetness that keeps the finish clean. This balance allows the airy structure to stay perceptible on the palate instead of being masked by sugar.
Because the crumb is fine and evenly hydrated, aromas release quickly once the cake is cut. That is also why this preparation pairs well on dessert tables with more assertive profiles such as Caramel Pumpkin Cheesecake Recipe, where contrast rather than similarity adds value.
Chef PEKIS recommends
Allow the cake to remain in the switched-off oven before cooling at room temperature; the gradual drop in heat prevents sudden contraction, which directly reduces surface shrinkage. Avoid moving the pan while hot, as vibration can weaken the internal network before it has fully set. If the center feels elastic rather than loose when gently pressed, the structure has stabilized correctly.
Storage and make-ahead
This cake is best prepared on the day of serving or the day before. Store covered in the refrigerator for up to 24 hours, then allow it to return to cool room temperature before slicing. Extended storage is not recommended, as moisture migration gradually tightens the crumb and reduces the light cotton cheesecake quality.
Served at the table, not rushed
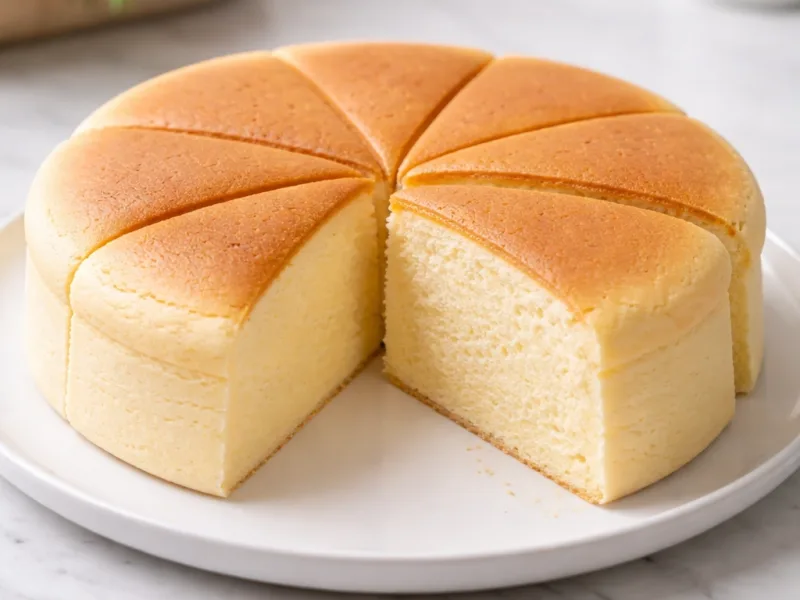
The first slice is easiest to judge while the plate is still cool and the crumb has settled. This is a baked version without a crust, and Japanese Cheesecake shows its character immediately once cut. The interior should separate cleanly, with an even pore structure and a soft spring when pressed lightly with a fork. There is no topping to distract from the surface, so what you see matters: a smooth, pale top and edges that hold without crumbling.
On the plate, the texture reads before the flavor. The crumb is fine and moist, not creamy, and the aroma stays restrained—dairy-forward with a faint citrus note that lifts the finish. Served plain, it works well after a meal where sweetness should remain subtle. A second slice often feels lighter than expected, which is usually the point at which guests notice how different this style is from dense, chilled cheesecakes.
When the crumb stays light to the last slice
This cake fits naturally into quiet gatherings and shared tables, where it can be cut gradually rather than plated all at once. It performs best when slices are lifted cleanly and set down without stacking; pressure dulls the structure. The surface stays dry to the touch, while the interior remains supple, giving a clear contrast between outside and center.
Even later in the day, the texture holds if the cake has rested properly. The crumb remains airy and elastic, not spongy, and the flavor stays balanced rather than sweet-heavy. That makes it suitable for afternoon service with coffee or as a light dessert after a long meal, where guests want something composed and easy to finish. The last slices should look much like the first, which is often the quiet mark of a well-made cake.
Questions
Is this cheesecake naturally gluten-free or does flour matter here?
Flour choice directly affects structure and moisture retention in this cake. Cake flour provides low protein, which limits gluten formation and keeps the crumb elastic rather than bready. Using regular all-purpose flour increases chew and tightens the interior. A gluten-free blend can work, but only if it behaves like low-protein flour; starch-heavy mixes perform better than rice-based ones in this style.
Why does my cheesecake rise well but sink after cooling?
Post-bake collapse is caused by rapid temperature change before proteins fully stabilize. When removed from heat too quickly, steam inside contracts and pulls the structure down. Gradual cooling allows moisture redistribution and protein setting to finish evenly. In home ovens, leaving the door slightly open reduces thermal shock and protects the internal network from sudden pressure loss.
Does a convection oven change the texture significantly?
Fan-assisted heat accelerates surface drying and can toughen the top layer. This cake relies on gentle, even heat and a humid environment to stay pale and soft. If convection cannot be disabled, lowering temperature and shielding the pan helps limit airflow impact. Conventional static heat produces more predictable results for this style in most domestic kitchens.
Can I bake this in a springform pan without leaking?
Springform pans introduce a real risk because the batter is thin and baked in water. Moisture ingress alters heat transfer and weakens structure near the base. Wrapping the pan tightly can help, but solid-sided pans are more reliable. Stability during baking directly affects crumb uniformity and prevents soggy edges.
Why does the center feel elastic instead of creamy when sliced?
Elastic texture indicates properly set egg proteins with retained moisture. This style is not meant to be creamy like dense cheesecakes; air incorporation and gentle heat create a sponge-like network. If the center feels rubbery, it was overbaked or exposed to excess airflow. A correctly baked center springs back lightly without resistance or wetness.
Recivelle · /recipe/easy-japanese-cheesecake-homemade-step-step