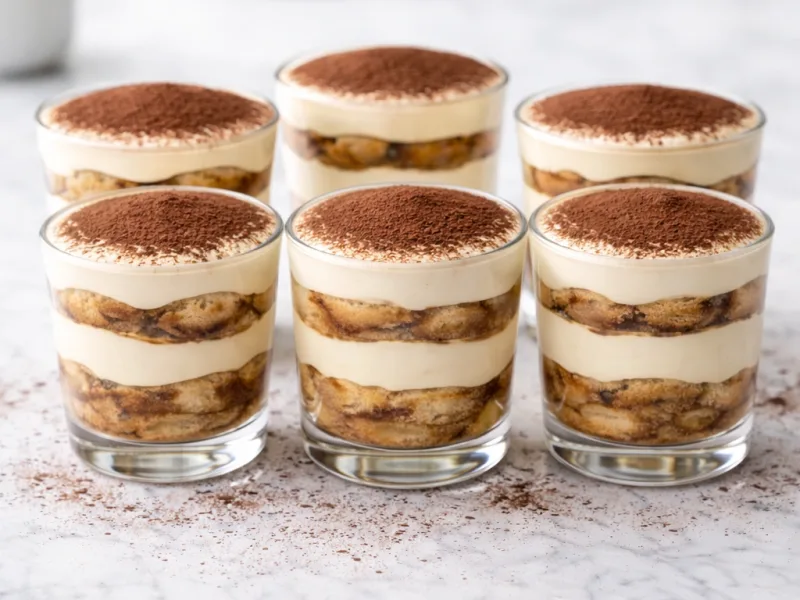
Base recipe: 6 tiramisu glasses
Your kitchen companion
Ingredients
Check off ingredients as you prepare them.
Follow the steps at your own pace.
Method
Prepare espresso: Brew 3/4 cup (200 ml) strong espresso using a coffee machine or moka pot and cool to room temperature (68–77°F / 20–25°C); liquid must feel neutral to the touch to avoid softening the cream.
Whisk egg base: Combine 3 large egg yolks (60 g) and 1/3 cup (80 g) granulated sugar in a mixing bowl and whisk for 2–3 minutes until pale and slightly thickened; mixture should form light ribbons when lifted.
Incorporate mascarpone: Add 1 cup (250 g) mascarpone cheese and 1/4 tsp (1 g) salt to the bowl and mix with a spatula until smooth and uniform; stop once no lumps remain to prevent grainy texture.
Whip cream: Pour 3/4 cup (200 ml) heavy cream into a separate bowl and whip with a hand mixer on medium speed for 2–3 minutes until soft peaks form; peaks should bend slightly when lifted.
Combine cream mixture: Fold the whipped cream into the mascarpone mixture using a spatula until fully incorporated; final texture should appear silky and aerated without visible streaks.
Soak ladyfingers: Dip each of the 24 ladyfinger biscuits (200 g) into the cooled espresso (200 ml) for 1 second per side using tongs; biscuits should absorb liquid but still hold shape when lifted.
Assemble first layer: Place a layer of soaked ladyfingers into each 200 ml glass, breaking pieces if needed to fit; base should be level and lightly compressed.
Add cream layer: Spoon a layer of cream mixture (approximately 2–3 cm thick) over the biscuits in each glass and smooth the surface with a spoon; cream should sit evenly without sinking.
Repeat layering: Add a second layer of soaked ladyfingers and cover again with cream mixture, filling each glass to about 85–90% capacity; layers should remain visually distinct.
Chill dessert: Place all glasses in a refrigerator at 39°F (4°C) for 240 minutes; chilling stabilizes the cream and allows moisture to distribute evenly through the biscuits.
Finish with cocoa: Dust 2 tbsp (10 g) unsweetened cocoa powder evenly over the top of each glass just before serving; surface should appear flat with a thin, velvety coating.
Extra technique, safety notes and details when you want to go deeper.
More tips & details
The Secret to Perfect Individual Tiramisu Servings
Mastering Stable Vertical Layers in Glass Cups
When hosting a dinner party, the goal is always a flawless finish. While I often rely on my Classic Tiramisu for larger crowds, serving individual portions in glasses offers a level of clean presentation and structural stability that a traditional tray cannot match. By assembling your dessert directly in a glass, you eliminate the stress of slicing, ensuring every guest receives a beautifully layered masterpiece that looks as good as it tastes.
Achieving Defined Layers and Visual Clarity
In this format, the primary quality marker is the visible separation between the rich cream and the espresso-soaked biscuits. You want to see a distinct horizontal structure through the glass. The key is to maintain the porous cake texture of the ladyfingers. Instead of a muddy or compressed base, a quick dip ensures the biscuits stay soft yet firm enough to hold their shape under the weight of the velvety mascarpone.
Whisking a Silky and Aerated Mascarpone Cream
The heart of a great tiramisu is a light, aerated cream with a gentle sheen. This isn't just a thick pudding; it is a stable mascarpone foam that should feel like silk on the tongue. By folding the mixture gently, we trap air that stays locked in during the chilling process. When you sink a spoon into the glass, you should feel minimal resistance, yet the cream should be firm enough to stand tall without collapsing.
Elegant No-Slice Presentation for Any Occasion
Because these are no-slice tiramisu cups, they move effortlessly from the refrigerator to the table. This direct-serving format reduces structural stress, meaning your layers stay perfectly intact until the first bite. For the best experience, I recommend serving these at a cool 43–46 °F (6–8 °C). At this temperature, the aromatic espresso and creamy vanilla notes are at their most vibrant, and the texture remains firm and satisfying.
Chef PEKIS’s Pro-Tips for Culinary Excellence
To ensure a gourmet result, always use cold ingredients during assembly. If your cream is too warm, the layers will begin to slip and blend. I cannot stress this enough: do not over-soak your biscuits. A fast, 1-second dip is all you need to prevent excess moisture from pooling at the bottom of the glass. Finally, for that professional finish, apply a velvety dust of cocoa just before serving to keep the surface dry and beautiful.
Make-Ahead Convenience and Storage Stability
These individual treats are perfect for prep-ahead planning. You can store them for up to 24 hours in the refrigerator at 39 °F (4 °C). In fact, the flavor profile actually improves after the first 6–8 hours as the espresso fully integrates with the mascarpone. Just remember to keep the glasses covered to maintain that fresh dairy aroma and prevent the surface from drying out.
Served directly in individual portions
At the table, tiramisu in a glass presents as a fully assembled dessert, not sliced but layered vertically for direct serving. The format is defined by visible structure rather than cut edges. A spoon moves through soft cream and soaked biscuit with minimal resistance, while each layer remains distinct. The surface shows a fine cocoa finish that stays dry and even, without clumping or moisture spots.
The first contact reveals a balanced texture: the cream feels smooth and light, while the biscuit offers a gentle softness without breaking apart. A clear sign of proper preparation is the absence of liquid at the base. The espresso note is present but controlled, supporting the dairy richness rather than dominating it. Each portion holds its shape from the first spoonful to the last.
Suitable for structured dessert service
This format fits naturally into settings where consistent portions are required, such as shared meals or plated dessert service. Each glass provides a fixed portion with no variation between servings, allowing uniform presentation across the table. The clean edges of the glass highlight the layered composition, making the dessert easy to evaluate visually before serving.
It performs well in environments where desserts are prepared ahead and served without additional handling. The structure remains stable during transfer from refrigeration to table, and the cream maintains a cohesive body. The result is a controlled, composed dessert that delivers the same texture and balance in every serving.
Questions
Why is tiramisu in a glass watery at the bottom after chilling?
Excess espresso and moisture release from over-soaked biscuits cause liquid pooling at the base. Ladyfingers absorb quickly but cannot retain excess liquid during chilling, leading to separation and diluted flavor. Keep dipping time extremely short and use fully cooled coffee to limit absorption. A stable result shows soft but intact biscuit layers with no visible liquid accumulation. Chef tip: Use a wide shallow bowl for espresso to control dipping speed and prevent oversaturation.
Can tiramisu in a glass be made without raw eggs safely at home?
Replacing raw yolks with pasteurized eggs or an egg-free mascarpone base eliminates safety risks while maintaining structure. Raw yolks contribute to emulsification and richness, but stability can be preserved through proper cream whipping and folding. The final texture becomes slightly firmer but remains smooth and cohesive without compromising layering. Chef tip: Use pasteurized liquid yolks for consistent results and safer preparation.
Why do tiramisu cups lose structure and collapse after a few hours?
Structural collapse occurs when biscuits are oversaturated and cream lacks sufficient aeration to support layers. Excess moisture weakens the biscuit matrix, while dense cream adds downward pressure. Maintain a light cream texture and minimal soaking time. Properly assembled portions remain vertically stable and hold clean layers when spooned. Chef tip: Stop whipping cream at soft peaks; overwhipping creates heaviness and instability.
How to get clean visible layers in tiramisu in a glass every time?
Clean layers depend on controlled layering and moisture balance between components. Uneven spreading or pressing causes blending during chilling. Each layer must be evenly distributed and left undisturbed to set properly. A correct result shows distinct cream and biscuit layers with sharp visual separation after chilling. Chef tip: Pipe the cream instead of spooning to keep layers precise and avoid mixing.
Recivelle · /recipe/tiramisu-in-a-glass