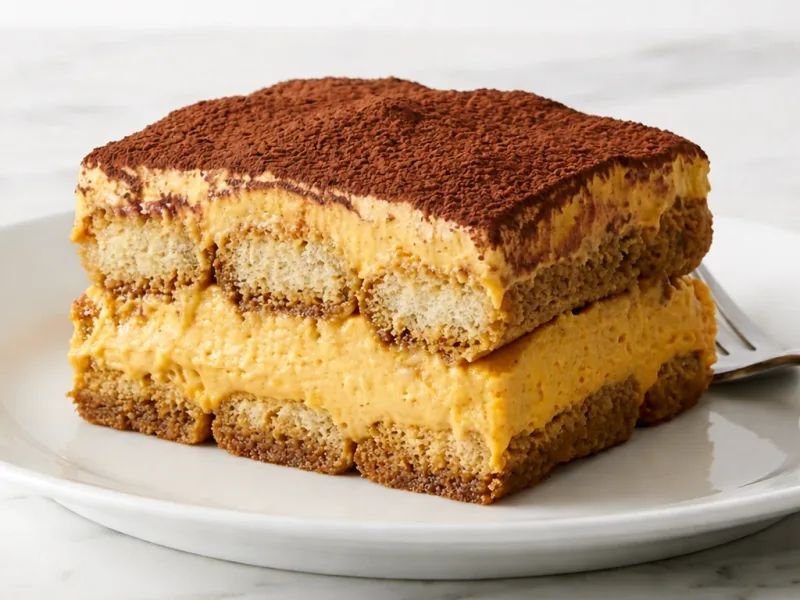
Base recipe: 12 servings
Your kitchen companion
Ingredients
Check off ingredients as you prepare them.
Follow the steps at your own pace.
Method
Whip cream: Using a cold mixing bowl and electric mixer, whip 1 cup (250 ml) heavy cream at medium speed until medium peaks form; the cream should hold shape but remain smooth and not grainy.
Mix mascarpone base: In a separate bowl, combine 10.5 oz (300 g) mascarpone, ½ cup + 1 tbsp (120 g) sugar, 1 tsp (5 ml) vanilla extract, and ¼ tsp (1 g) salt; mix with a spatula until fully smooth with no lumps.
Fold cream: Add whipped cream in two portions into the mascarpone mixture; gently fold using a spatula until fully incorporated and airy, avoiding deflation.
Add pumpkin: Fold in ¾ cup (200 g) pumpkin puree and ½ tsp (2 g) ground cinnamon until the mixture becomes evenly colored and stable.
Prepare soaking liquid: Pour ¾ cup (200 ml) brewed coffee into a shallow dish; ensure it is fully cooled to prevent melting the cream.
Dip ladyfingers: Dip each ladyfinger into the coffee for exactly 1 second per side; the surface should be moist but not soaked through.
Form first layer: Arrange dipped ladyfingers tightly in a 20 × 30 cm (8 × 12 inch) rectangular tray, covering the base completely.
Spread first cream layer: Spread half of the pumpkin cream evenly over the ladyfingers using a spatula to approximately 0.6 inch (1.5 cm) thickness; surface should be level.
Form second layer: Repeat dipping with remaining ladyfingers and place a second layer evenly over the cream.
Spread final cream: Spread the remaining cream evenly on top and smooth the surface completely flat to ensure clean slicing later.
Dust cocoa: Using a fine sieve, dust 2 tbsp (20 g) cocoa powder evenly across the surface; the layer should be dry and uniform.
Chill dessert: Cover the tray and place in refrigerator at 39°F (4°C) on the middle rack for 240 minutes; this resting period stabilizes structure and allows clean slicing.
Extra technique, safety notes and details when you want to go deeper.
More tips & details
The Ultimate Fall Dessert with a Reliable Structure
Creamy Pumpkin Tiramisu That Slices Cleanly Without Eggs
Creating a successful pumpkin tiramisu without eggs is all about mastering a controlled structure and achieving that perfect, predictable slice. While many bakers begin their journey with a classic tiramisu that uses egg-based aeration, this autumn variation focuses on stability through a precise dairy balance. This method produces an 8 x 12 inch (20 x 30 cm) tiramisu with beautiful, vertical edges that hold their shape from the very first cut.
A Stable Cream Without Traditional Egg Emulsions
The secret to this velvety texture lies in how we manage fat distribution and air rather than relying on cooked eggs. When the mixture is whipped to medium peaks, it transforms into firm yet smooth layers that won't collapse after chilling. You will know you are on the right track when the cream spreads easily across the ladyfingers without flowing into the layers below. This no egg tiramisu recipe ensures consistent, professional results even if you are baking in a humid environment.
Defining Every Layer for a Professional Finish
Because pumpkin puree naturally adds moisture to the cream, it is vital to keep your coffee soak quick and superficial. This prevents the ladyfingers from becoming soggy and allows the base to stay hydrated without collapsing under the weight of the filling. The goal is a stable layered dessert where the vibrant orange pumpkin cream and the dark coffee-soaked biscuits remain distinct. A perfect tray will show no liquid pooling at the bottom after resting in the fridge.
Balancing Warm Spices with Mild Coffee Notes
The soul of this dish is the aromatic blend of cinnamon and pumpkin, which requires a gentle touch with the coffee. If the coffee is too strong, it can mask the delicate, vegetal sweetness of the pumpkin. When aligned correctly, the scent of warm spices hits you first, followed by a light, roasted coffee finish. The cocoa powder on top should remain dry and matte, a sign that you have successfully controlled the humidity during the chilling process.
How to Serve the Perfect 2 x 4 Inch Slice
This tiramisu performs best when it is fully chilled to approximately 40°F (4°C). Within this temperature window, the 2 x 4 inch (5 x 10 cm) portions lift cleanly from the tray without dragging or smudging the layers. The texture should offer a slight resistance to your fork while remaining incredibly smooth on the palate. This structural integrity ensures that every plate you serve looks as beautiful as it tastes.
Chef PEKIS Recommendations for Success
Always work with dairy that has been fully chilled in the refrigerator to 40°F (4°C) to ensure proper aeration. Over-whipping can lead to a grainy texture, which makes the layers weaker and less cohesive. Keep your soaking time to a 1-second dip; anything longer will result in a loss of structure at the base. Finally, do not rush the cooling process; the full resting time is non-negotiable for the layers to stabilize.
Make-Ahead Tips and Proper Storage
This dessert is an excellent choice for entertaining because it can be prepared up to 48 hours in advance. Beyond this point, the moisture will begin to migrate, softening the ladyfingers and blurring the beautiful definition of your layers. Store the tray tightly covered in the refrigerator at 40°F (4°C) to prevent the cream from drying out, and always portion it directly from the cold to preserve that signature stable build.
Elegant Autumn Indulgence
Tiramisu alla Zucca captures the essence of autumn with its silky pumpkin layers, rich mascarpone cream, and aromatic espresso-soaked ladyfingers. Every spoonful delivers a perfect balance of warm spices, sweetness, and velvety texture — a dessert that feels luxurious yet remains incredibly simple to prepare. The no-bake format makes it ideal for effortless entertaining, allowing you to create an elegant centerpiece without turning on the oven.
Effortless Preparation, Lasting Flavor
Requiring just 25 minutes of active time, this dessert transforms everyday ingredients into a masterpiece of flavor and texture. The pumpkin purée adds natural sweetness and creaminess, while the coffee and cocoa bring depth and balance. After a few hours of chilling, the layers meld together into a perfectly smooth, melt-in-the-mouth consistency that keeps its form when sliced. Whether made the day before or served freshly assembled, Tiramisu alla Zucca delivers consistent, professional results every time.
Perfect for Every Table
Ideal for holiday dinners, Thanksgiving gatherings, or cozy fall evenings, this tiramisu adapts to every occasion. Its flexibility allows for easy gluten-free or dairy-free substitutions without losing flavor or structure, making it suitable for nearly every guest. The combination of pumpkin spice aroma and creamy texture turns a traditional Italian dessert into a modern autumn classic loved across generations.
Why It Stands Out
Tiramisu alla Zucca unites the timeless elegance of Italian patisserie with the comforting flavors of the season. Simple to assemble, rich in taste, and visually stunning, it’s the perfect dessert to impress guests or enjoy as a quiet indulgence at home. Serve it chilled with a dusting of cocoa or a drizzle of maple syrup — a true celebration of flavor, warmth, and effortless sophistication.
Questions
Why is my pumpkin tiramisu watery at the bottom after chilling?
Watery layers form when excess moisture from pumpkin puree or over-soaked ladyfingers releases liquid during chilling. Pumpkin naturally contains water, and saturated biscuits cannot hold structure, causing drainage into the base. Use thick puree and limit dipping to one second per side to control absorption. A properly balanced layer remains moist but not wet, with no pooling visible. Chef tip: Spread puree on paper towel for 10 minutes before use to remove excess water.
How do you make pumpkin tiramisu without eggs that still holds shape?
Stable structure comes from correct fat ratio and controlled aeration, not eggs. Whipped cream provides air, while mascarpone locks the structure in place. If the cream is under-whipped, layers collapse; if over-whipped, texture becomes grainy and unstable. Medium peaks ensure a smooth, sliceable consistency that holds clean edges after chilling.
Why are my tiramisu layers not clearly visible after cutting?
Layer definition fails when cream is too soft or biscuits are over-soaked, causing merging. A stable cream should hold its shape when spread and not flow into adjacent layers. Ladyfingers must be lightly dipped, not saturated. Proper layering results in visible separation between cream and biscuit with clean vertical lines when sliced.
How strong should coffee be in pumpkin tiramisu for balanced flavor?
Balanced flavor requires mild to medium-strength coffee so pumpkin and spice remain dominant. Strong coffee introduces bitterness and masks the pumpkin profile, while weak coffee removes contrast. The correct intensity produces a light coffee aroma without overpowering sweetness or spice, maintaining a rounded and stable flavor profile.
Recivelle · /recipe/pumpkin-tiramisu-dessert-no-eggs