Base recipe: 8 servings
Your kitchen companion
Ingredients
Check off ingredients as you prepare them.
Follow the steps at your own pace.
Method
Prepare coffee mixture: Combine 150 ml (⅔ cup) cooled coffee with 20 ml (1 tbsp + 1 tsp) coffee liqueur in a shallow bowl; keep at room temperature to avoid dissolving the biscuit structure.
Whip cream: Beat 200 ml (¾ cup + 1 tbsp) heavy cream with 80 g (⅓ cup + 1 tbsp) sugar and 1 g (¼ tsp) salt using a hand mixer at medium speed until medium peaks form (cream holds shape but tips slightly fold).
Incorporate mascarpone: Add 250 g (8.8 oz) mascarpone and 5 ml (1 tsp) vanilla extract; mix at low speed just until smooth and uniform to prevent overwhipping.
Prepare hazelnut cream: Transfer one-third of the cream mixture and fold in 120 g (½ cup) hazelnut spread until evenly combined; mixture should appear slightly darker and thicker.
Dip biscuits: Quickly dip each of the 200 g (7 oz) savoiardi into the coffee mixture for 1 second per side; biscuits should be moist on the surface but firm inside.
Build base layer: Arrange half of the dipped savoiardi in a 20 × 20 cm (8 × 8 inch) dish in a tight, even layer with no gaps.
Apply first cream layer: Spread half of the plain mascarpone cream evenly over the biscuits using a spatula; surface should be level and smooth.
Add second biscuit layer: Place remaining dipped savoiardi evenly over the cream, aligning them for structural support.
Spread hazelnut layer: Apply the hazelnut cream evenly; ensure full coverage to create a defined middle layer.
Finish with cream: Spread remaining mascarpone cream evenly on top; smooth surface without pressing down to preserve aeration.
Dust and garnish: Sift 15 g (2 tbsp) cocoa powder evenly over the surface and sprinkle 40 g (⅓ cup) ground hazelnuts lightly; surface should appear dry and matte.
Chill to set: Refrigerate at 39°F (4°C) for 240 minutes; this stabilizes layers and allows moisture redistribution for clean slicing.
Extra technique, safety notes and details when you want to go deeper.
More tips & details
Flawless No-Egg Hazelnut Tiramisu
Creamy Layers & Clean Slices Every Time
Built on the comforting, melt-in-your-mouth foundation of a classic Italian tiramisu, this beginner-friendly version skips the raw eggs in favor of a velvety, rich whipped cream and mascarpone base. The result is a beautifully structured hazelnut tiramisu that cuts into perfectly clean, vertical slices without any risk of collapsing on your plate. Best of all, this 20-minute no-egg tiramisu comes together effortlessly, locking in its shape even before it hits the fridge.
Chilling for Perfect Layer Stability
The secret to those beautiful, sky-high slices is a luscious cream that firms up beautifully as it cools, without ever tasting heavy or dense. By gently folding the chilled fats and whipped air together, we create a light, pillowy network that traps the rich roasted hazelnut flavors. You will know you are on track when your top layer smooths out flat and floats effortlessly over the ladyfingers. The biscuits should look irresistibly soaked but still hold their shape, giving you that perfect cake-like bite instead of a soggy base.
Roasted Nut Flavor & Balanced Sweetness
The magic of this dessert lies in its irresistible flavor contrast: deep, roasted hazelnut notes, a gentle kick of bitter espresso, and a carefully restrained sweetness that lets the natural nut aroma shine. This creamy no-bake hazelnut tiramisu tastes wonderfully sophisticated, finishing with a clear, lingering hazelnut richness rather than a heavy sugar rush. A tiny pinch of salt naturally enhances the luxurious mascarpone, making the cream taste incredibly full and satisfying.
Three Pillars of Tiramisu Success
- Layer definition: Clear, distinct lines between the fluffy cream and the tender biscuit ensure your dessert stands tall and structurally accurate.
- Cream density: A light, velvety texture proves you have whipped enough air into the mascarpone without overmixing it into a heavy block.
- Moisture control: A quick, precise coffee dip gives you an evenly hydrated base that prevents a soggy bottom and supports a beautifully clean slice.
Chef PEKIS Tips for Reliable Results
Always start with cold ingredients; if your cream warms up to room temperature, it loses its airy lift and spreads too thinly. Fold your mixture gently to protect those delicate air bubbles, as aggressive stirring will break the silkiness and leave you with a dense dessert. Finally, treat the coffee dip like a quick splash—prolonged soaking guarantees a soggy bottom that will collapse when you cut it due to excess moisture. One quick, confident pass is all those sweet biscuits need!
A Flawless Cocoa Surface Finish
A professional finish features a gorgeous, matte dusting of cocoa powder with absolutely no weeping or wet patches. This dry surface is your visual cue that the top cream layer has perfectly stabilized and is not leaking moisture. Keep your toasted hazelnut garnish light and evenly distributed, allowing the beautiful layers beneath to remain the visual star of the show.
Storing and Prepping Your Tiramisu
This elegant dessert is the ultimate make-ahead treat for dinner parties. You can prepare it fully in advance and store it covered in the refrigerator at 39°F (4°C) for up to 24 hours. The texture actually becomes more magnificent during the first 4 to 6 hours as the flavors mingle and the ladyfingers soften into a delicate sponge. Beyond 24 hours, the biscuits will become a bit too soft, slightly reducing that picture-perfect slice integrity. Do not freeze this dessert, as thawing will shatter the delicate, creamy emulsion and cause those beautiful layers to separate.
Served chilled with clean layers and balanced texture
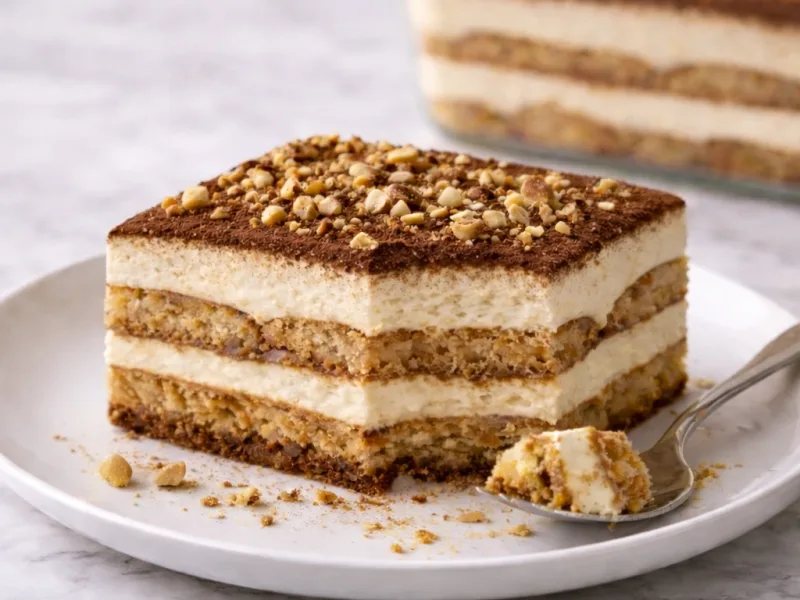
A slice of hazelnut tiramisu, prepared as a no-bake, no-egg dessert, presents a structure that holds firmly when cut yet remains soft on the palate. The cream settles into a smooth, cohesive layer that supports the soaked biscuits without merging into them. Each bite shows a clear separation between elements, where the hazelnut component adds depth without overwhelming the coffee base.
Fits naturally into calm, plated dessert service
Served after a meal, this dessert works best when portioned cleanly and placed on a neutral plate, allowing the layers to remain visually defined. The texture stays consistent from edge to center, with no collapse or excess moisture release. The surface retains a dry cocoa finish, indicating proper setting and balance. It suits both individual plating and shared service, where uniform slices maintain presentation without adjustment.
In cooler seasons, it aligns well with coffee-based menus, offering a stable and composed finish without heaviness. The cream remains light while still delivering a full texture, making it suitable for extended service without deterioration in structure. This consistency allows it to sit comfortably alongside other plated desserts without requiring immediate consumption.
The final texture offers reassurance: the layers hold, the cream remains aerated, and the base stays intact without becoming dense. A properly prepared portion keeps its form from first cut to last bite, with no separation or graininess.
Questions
Why does hazelnut tiramisu collapse after slicing layers?
Collapse occurs when the cream structure is unstable due to excess moisture or weak aeration. In practice, this usually means the biscuits were dipped too long or the cream was mixed too aggressively. Both reduce the internal support needed to hold layers upright. Focus on quick dipping and gentle folding—this keeps the structure intact and ensures clean slices. Chef tip: Always dip biscuits for no more than 1 second per side. If they feel heavy in your hand, they are already over-soaked.
Is hazelnut tiramisu without eggs structurally stable enough?
Yes, stability comes from fat-based emulsification, not eggs. When done correctly, the mascarpone and cream create a naturally stable structure that sets firmly during chilling. The key is balance—whip just to medium peaks and stop mixing as soon as everything is combined. This keeps the texture light while still holding its shape when sliced. Chef tip: If the cream looks too thick or starts losing shine, stop immediately—this is the point just before overmixing.
Why do savoiardi in tiramisu become too soggy or dense?
Sogginess results from over-absorption of liquid, which breaks the biscuit’s internal structure. This happens quickly, especially with warm or overly strong coffee. The biscuits should only absorb surface moisture and finish softening in the fridge. If they collapse during assembly, the final dessert will lack structure and feel heavy. Chef tip: Use fully cooled coffee. Warm liquid accelerates absorption and leads to soggy layers.
How to achieve visible hazelnut layer contrast in tiramisu?
Contrast depends on even incorporation of hazelnut spread into a portion of the cream. In real kitchen work, this means taking your time with this step—rushed mixing leads to uneven color and weak visual layers. A properly blended hazelnut cream will be slightly darker and clearly defined between layers. Chef tip: Mix the hazelnut portion separately in a small bowl before spreading—it gives better control and cleaner layering.
What causes grainy texture in mascarpone cream for tiramisu?
Graininess forms when mascarpone is overworked or too cold, causing fat separation. This is a common mistake when working straight from the fridge or mixing too fast. Let the mascarpone soften slightly and always mix gently. The goal is a smooth, glossy cream that spreads easily without breaking. Chef tip: If graininess starts, stop mixing immediately and fold gently by hand to recover texture.
Recivelle · /recipe/creamy-hazelnut-tiramisu-20-minutes-no-eggs