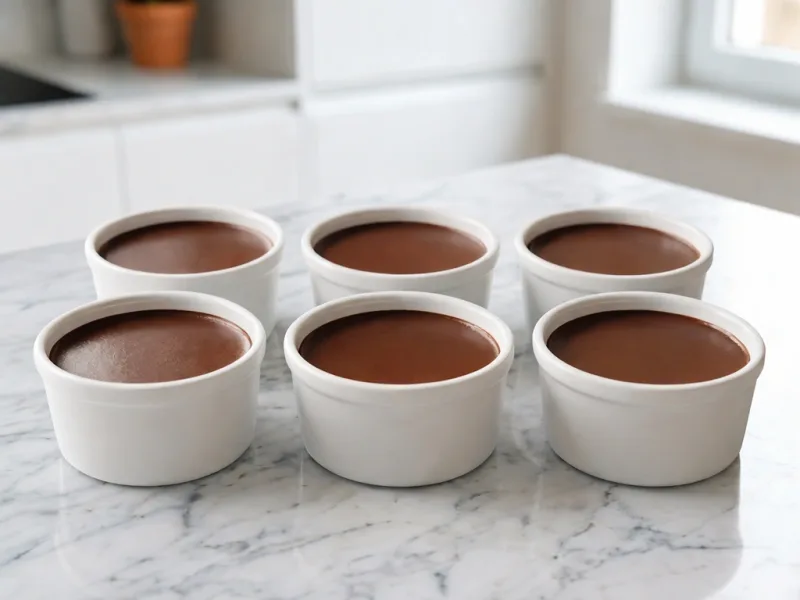
Base recipe: 6 servings
Your kitchen companion
Ingredients
Check off ingredients as you prepare them.
Follow the steps at your own pace.
Method
Bloom the gelatin: Place 1 tbsp (8 g) powdered gelatin in a small heatproof bowl. Add 2 tbsp + 2 tsp (40 ml) cold water and stir gently with a teaspoon. Let stand for 5 minutes so the gelatin absorbs the water and forms a soft gel. This hydration step activates the gelatin and ensures a smooth, even set later.
Heat the dairy base: Pour 1⅔ cups (400 ml) heavy cream and ¾ cup + 1 tbsp (200 ml) whole milk into a medium saucepan (2–3 quart / 2–3 L capacity). Add ⅓ cup + 1 tbsp (70 g) sugar and ¼ tsp (1 g) fine salt. Heat over medium heat on the stovetop while stirring with a silicone spatula. Warm the mixture to 180–185 °F (82–85 °C). The liquid should produce light steam with small bubbles forming around the edge of the pan but must not boil.
Melt the chocolate: Remove the saucepan from heat. Add 4.2 oz (120 g) finely chopped dark chocolate. Whisk slowly until the chocolate melts completely and the mixture becomes smooth and glossy. If small pieces remain, place the pan briefly on very low heat while whisking continuously.
Dissolve the gelatin: Add the bloomed gelatin mixture to the hot chocolate cream. Whisk gently for about 30 seconds until the gelatin dissolves fully. The liquid should appear completely smooth with no visible gelatin particles.
Add the vanilla: Stir in 1 tsp (5 ml) vanilla extract with a whisk. Mix for about 10 seconds to distribute the aroma evenly throughout the warm chocolate cream.
Strain the mixture: Place a fine-mesh sieve over a heatproof measuring jug or bowl. Pour the chocolate cream through the sieve to remove any undissolved chocolate particles. This step ensures a perfectly silky final texture.
Fill the ramekins: Divide the mixture evenly into six ramekins, each holding about ½ cup (120 ml). Leave about ½ inch (1 cm) space at the top of each ramekin to prevent spills during refrigeration.
Cool slightly: Allow the filled ramekins to stand at room temperature for 15 minutes. This cooling stage prevents condensation in the refrigerator and stabilizes the mixture before the gelatin begins setting.
Chill the dessert: Place the ramekins in a refrigerator set to 39 °F (4 °C). Chill for 240 minutes. To check doneness, gently shake one ramekin. The center should wobble slightly while the edges remain firm.
Serve: Remove the ramekins from the refrigerator and let them stand at room temperature for 5 minutes before serving. This short resting time softens the gelatin structure and improves the creamy mouthfeel.
Extra technique, safety notes and details when you want to go deeper.
More tips & details
Mastering the Rich Chocolate Panna Cotta Variation
Indulgent Cocoa Profile and Serving Context
This cocoa-enriched variation adapts the method used in our classic panna cotta recipe by integrating dark chocolate directly into the warm cream base. The chocolate is melted into the cream before the gelatin is added, allowing the mixture to retain the same delicate gel structure that defines the original dessert. After chilling to approximately 40 °F (4 °C), the panna cotta forms a stable yet tender set that holds its shape when unmolded or served in ramekins. The finished surface should appear glossy and uniform, showing a slight wobble when the dish is gently moved.
A chocolate version is particularly suited for elegant plated desserts or small ramekin portions served after a warm meal. The rich cocoa notes become more pronounced as the dessert warms slightly during service, typically after sitting for 3–5 minutes at room temperature. This version ensures the interior remains smooth and cohesive, solving the common problem of grainy textures often found in heavier chocolate puddings.
Structural Adjustments for a Perfect Chocolate Set
The primary technical difference in this variation is the addition of melted dark chocolate to the heated dairy. Cocoa butter and solids naturally increase the viscosity of the base, providing a thicker consistency even before the gelatin set begins to form. This structural boost allows the dessert to develop a deep flavor and dark color while preserving the signature creaminess.
Because chocolate contributes its own fat and structure, the gelatin level remains moderate. Using excess gelatin would result in a rubbery texture rather than the intended soft gel. When balanced correctly, this no-bake chocolate panna cotta maintains a clean slice and a gentle jiggle that signals a professionally formed gel network.
Technical Gelatin Behavior and Cocoa Dispersion
For a 10/10 result, the chocolate must disperse evenly to prevent sedimentation during the chilling process. When finely chopped chocolate melts into the hot cream, the cocoa particles are suspended throughout the liquid. As the mixture cools below 60 °F (15 °C), the hydrated gelatin strands form a protein network that traps both the dairy fats and the cocoa solids. This creates a cohesive, silky smooth chocolate dessert where the flavor and structure develop simultaneously.
Visual Indicators of a Professional Quality Set
Once fully chilled, the dessert should display clear markers of successful preparation. Look for a glossy surface without cracks, a consistent dark chocolate tone without pale streaks, and a clean spoon cut that reveals a smooth, creamy interior. These visual cues confirm that the chocolate was fully emulsified and the gelatin set evenly during refrigeration.
Expert Technical Tips from Chef PEKIS
Ensure the cream mixture reaches a temperature of 180–185 °F (82–85 °C) before adding the chocolate. This range is hot enough to melt cocoa butter efficiently but prevents the dairy from boiling. Stir continuously until the liquid is entirely smooth to avoid leaving behind visible chocolate fragments. Most importantly, do not overheat the mixture once the gelatin is incorporated, as excessive heat can weaken the setting power and ruin the characteristic wobble.
Storage Stability and Make-Ahead Preparation
This dessert is perfect for advance preparation as it stores exceptionally well under refrigeration. Keep the ramekins covered at 40 °F (4 °C) for up to three days, which allows the deep chocolate flavors to fully develop. For the best texture, remove the panna cotta from the refrigerator about 5 minutes before serving. This brief resting period softens the gel slightly, returning the interior to its intended velvety richness without compromising the structure.
A Quiet Finish to the Table
Chocolate panna cotta appears here as a chilled cream dessert set with gelatin rather than eggs. Served in small ramekins, it arrives at the table with a smooth glossy surface and a gentle wobble that signals the correct structure. The first spoonful reveals a texture that holds together briefly before dissolving on the tongue. Dark chocolate softens the dairy base, leaving a clean cocoa note that lingers lightly rather than overwhelming the palate.
This dessert often follows a warm main course when the table calls for something cool and balanced. The cream carries the chocolate flavor evenly, while the subtle sweetness prevents the finish from becoming heavy. When served alongside coffee or a small espresso, the cocoa notes become more pronounced and the texture feels even softer as it warms slightly in the dish.
The most recognizable cue appears when the spoon breaks the surface. A proper panna cotta shows a soft, even cut without crumbs or liquid separation. The interior remains uniform from edge to center, confirming that the cream and chocolate settled together into a stable gel.
A Dessert That Welcomes Small Gatherings
Placed at the center of a shared table, these small portions encourage a slower pace at the end of the meal. Each ramekin carries the same calm presentation: dark cream color, level surface, and a subtle shine. Nothing competes with the dessert itself, which is why it often appears without garnish or decoration.
The flavor suits evenings when the meal leans toward savory dishes such as roasted vegetables, grilled meats, or pasta. Chocolate here behaves quietly, adding depth rather than sweetness. The result feels complete yet restrained, leaving space for conversation while the last spoons reveal the dessert’s silky interior.
At gatherings where several small desserts appear together, this preparation often stands out for its texture. The gentle wobble and creamy structure offer contrast to cakes or pastries, giving the table a cooler, smoother element that finishes the meal without heaviness.
Questions
Why did my chocolate panna cotta not set in the fridge?
Chocolate panna cotta does not set when gelatin is insufficient, improperly bloomed, or overheated during preparation. Gelatin must hydrate in cold water before dissolving in hot liquid around 180–185 °F (82–85 °C). If the mixture boils after gelatin is added, the protein structure weakens and cannot form a stable gel. The correct texture is a soft wobble that holds shape when the ramekin is gently tilted. Chef tip: Bloom gelatin for a full 5 minutes and stir it into the hot cream until the mixture looks completely smooth and clear.
How do I know chocolate panna cotta is fully set?
Chocolate panna cotta is fully set when the surface is firm but the center shows a gentle wobble when the ramekin is lightly shaken. Properly set panna cotta holds its shape while remaining creamy when scooped with a spoon. This usually occurs after at least 4 hours of refrigeration at 39 °F (4 °C). If the center moves like liquid, the gelatin network has not fully formed. Chef tip: Lightly tilt the ramekin; a slow jiggle indicates the correct gel structure.
Can I make chocolate panna cotta with milk instead of heavy cream?
Chocolate panna cotta made only with milk will set but the texture becomes thin and less creamy. Heavy cream provides the fat needed to stabilize cocoa solids and produce the classic silky mouthfeel. Milk alone reduces viscosity and weakens the gel network formed by gelatin. The finished dessert may appear pale and feel lighter rather than rich and smooth. Chef tip: For a lighter version, replace only one third of the cream with milk to preserve texture.
What chocolate works best for chocolate panna cotta?
Dark chocolate containing 60–70% cocoa produces the most balanced texture and flavor. Chocolate with lower cocoa percentages contains more sugar and stabilizers that can soften the gel, while extremely dark chocolate can overpower the cream base. When properly melted into hot cream, this cocoa range creates a smooth chocolate emulsion that sets evenly during chilling. Chef tip: Finely chop chocolate before adding it to the hot cream so it melts evenly without grainy particles.
Why does chocolate panna cotta turn grainy instead of smooth?
Grainy texture happens when chocolate is not completely melted or the mixture separates during cooling. Cocoa solids must disperse evenly in the warm cream mixture to create a stable emulsion. If the liquid is not hot enough or the chocolate pieces are too large, particles remain suspended and become noticeable after chilling. A correct mixture appears uniform, glossy, and fully blended before pouring. Chef tip: Strain the mixture through a fine sieve before filling ramekins to ensure a perfectly smooth texture.
Recivelle · /recipe/chocolate-panna-cotta-silky-smooth-dessert-gelatin-set