Base recipe: 4 servings (8 pieces)
Your kitchen companion
Ingredients
Check off ingredients as you prepare them.
Follow the steps at your own pace.
Method
Dry the chicken: Place the 2.6 lb (1.2 kg) chicken pieces on a wire rack and pat them dry using paper towels until the surface feels slightly tacky, not wet.
Marinate the chicken: Transfer the chicken into a large glass bowl and add 1 cup (240 ml) buttermilk and 1 tsp (6 g) salt. Mix by hand until fully coated, cover, and refrigerate at 39°F (4°C) for 60 minutes.
Drain excess marinade: Remove each piece from the bowl and hold it above the bowl for 10 seconds, then shake once gently until the surface looks damp but not dripping.
Prepare the coating: In a large stainless steel bowl, combine 1 cup (150 g) flour, 0.3 cup (50 g) cornstarch, 1 tsp (6 g) baking powder, 1 tsp (6 g) salt, 1 tsp (5 g) black pepper, 1 tsp (5 g) garlic powder, 1 tsp (5 g) onion powder, and 0.5 tsp (3 g) smoked paprika. Mix until evenly distributed.
Coat the chicken: Place each chicken piece into the coating mixture and press firmly using your hands until rough flakes form across the surface and no wet spots remain visible.
Rest the coating: Arrange coated chicken on a wire rack and leave at room temperature for 10 minutes to allow the coating to hydrate and bond to the surface.
Preheat the air fryer: Set the air fryer to 400°F (200°C) and preheat for 5 minutes until fully heated.
Apply oil: Using a spray bottle or spoon, apply 2 tbsp (30 ml) oil evenly over all chicken pieces until the surface looks lightly glossy without soaking the coating.
Arrange for airflow: Place the chicken in the air fryer basket in a single layer with at least 0.8 inch (2 cm) space between each piece so hot air can circulate freely.
Cook first phase: Cook in the air fryer at 400°F (200°C) for 12 minutes until the surface begins to turn light golden and feels dry to the touch.
Turn the chicken: Use metal tongs to flip each piece carefully without scraping the crust.
Cook second phase: Continue cooking at 400°F (200°C) for another 12 minutes until the crust is deep golden and produces a hollow, crisp sound when tapped.
Check doneness: Insert a thermometer into the thickest part of the meat using a digital probe; it must read 165°F (75°C).
Rest the chicken: Place the cooked chicken on a wire rack and rest for 5 minutes to allow juices to redistribute and the crust structure to stabilize.
Extra technique, safety notes and details when you want to go deeper.
More tips & details
Culinary Physics of the Perfect Crunch
Technical Mechanism of Shatter-Crust Formation
To master this Air Fryer Chicken No-Soggy Shatter-Crust, you must force a rapid moisture exit through convection before the juices can steam the coating. If you have followed the internal heat rules in my Air Fryer Meat Guide: Temperatures, Resting & Techniques, you know that crispness isn't about heat—it's about dehydration. Most home attempts fail because the surface remains damp for too long, turning your breading into a soggy sponge instead of a rigid shell.
In my test kitchen, I've observed that wet chicken simply refuses to crisp. When water evaporates slowly, the starch turns to mush. We are aiming for a violent transition: damp to dry to rigid. If you listen closely at the 10-minute mark at 400°F (200°C), you should hear a faint, high-pitched crackling—that is the acoustic signal of the water barrier breaking and the formation of a shatter-crust.
Structural Behavior of the Coating
I use a flour-cornstarch ratio that deliberately pits structure against brittleness. While flour provides the frame, cornstarch acts as the "shatter agent" by weakening gluten bonds to ensure the coating fractures rather than bends. When you press this into the meat, the coating should feel gritty and resistant; this is your first tactile cue that the crust has the structural integrity to hold its shape under the fan.
I’ve watched too many cooks rush the bird straight into the basket. Give it a 10-minute rest; this allows the coating to tack onto the surface and hydrate just enough to bond without becoming wet. Before you cook, touch a piece—it should feel like cold, dry velvet. If it feels sticky, you’ve used too much liquid; if it’s loose powder, it will simply blow around the air fryer and leave the meat bare.
Chef PEKIS’s Rules for Consistent Crisping
Stop scrubbing the chicken with a brush; you’ll only tear the fragile flakes you worked so hard to create. Use a fine oil mist until the surface looks like a dull satin. If the oil is pooling in the crevices, you've over-saturated the breading, which creates a heavy, greasy barrier that prevents the surface from ever reaching its full potential.
Spacing is the one rule I never break. Pieces must have at least 1 inch (2.5 cm) of breathing room between them. I’ve tested crowded baskets repeatedly—the moment pieces touch, the air velocity drops and creates a steam trap. You’ll see the result in about 22 minutes: pale, soft "bald spots" where the heat couldn't reach, ruining the uniform golden armor.
Airflow Control and Heat Interaction
Think of your air fryer as a wind tunnel, not an oven. That moving air is your primary tool for stripping away humidity and "sandblasting" the moisture off the skin. If you overload the tray, you choke the engine and stall the browning process. We are looking for maximum air velocity to ensure the heat penetrates the coating instantly.
When you flip the pieces midway, look for a pale gold, rigid underside. If it’s still soft or damp, your airflow is restricted. This is the exact principle I teach in my Crispiest Air Fryer Garlic Parmesan Chicken Wings, where skin rendering and airflow work in tandem to create a crunch. In this recipe, the moving air must dry the flour before the internal juices can migrate back to the surface.
Storage and Structural Stability
Fresh out of the heat, the crust is at its most fragile state. Let it rest for 5 minutes on a wire rack—never a flat plate—to allow the internal pressure to settle without steaming the bottom. As it cools, you’ll hear the "singing" of the crust; a series of tiny snaps that tell you the surface has successfully turned into brittle glass.
If you must store leftovers, realize that cold refrigeration is the enemy of the crunch. To bring it back to life, hit it at 350°F (180°C) for 5 minutes in the air fryer. Watch for the transition from a dull, matte finish back to a slight, shimmering gold—that is the sign that the oil has re-activated and the crust’s rigidity has returned.
Immediate Structural State and Serving Behavior
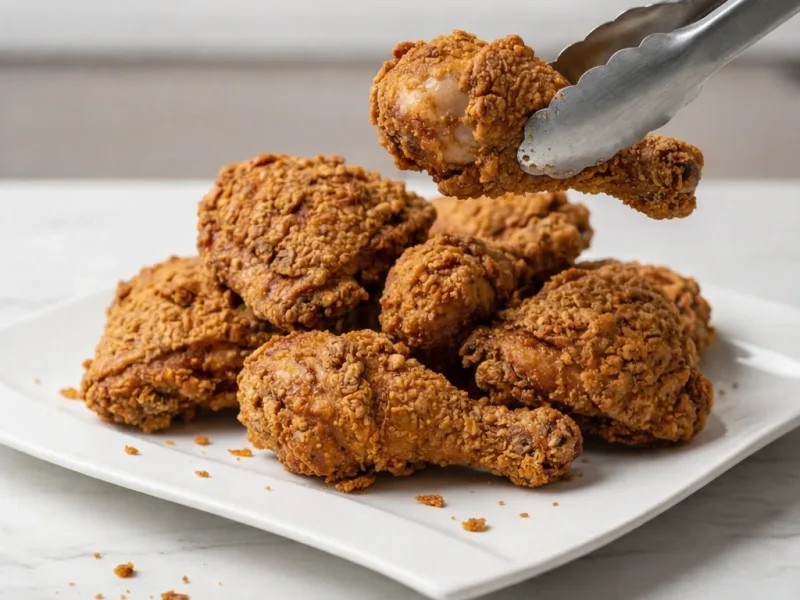
Air Fryer Chicken No-Soggy Shatter-Crust Technique presents as a structurally stable assembly with a brittle exterior and controlled internal moisture. Once plated, the crust remains dry and rigid, with no visible oil pooling or surface collapse. The pieces hold their shape under light pressure, and the coating maintains separation from the meat rather than compressing into it. This indicates that surface dehydration was complete and the starch structure has set properly.
When cut or bitten, the crust fractures cleanly with a distinct audible break. You will notice a sharp crack followed by immediate exposure of moist interior fibers. The aroma releases in two stages—first toasted spice notes from the crust, then warm poultry fat as the interior opens. The mouthfeel is defined by contrast: a dry, fragile shell against a tender core, with no intermediate softness.
Timing, Pairing, and Environmental Stability
The structure begins to change after approximately 12–15 minutes at room temperature. As internal moisture migrates outward, the crust gradually loses its rigidity and transitions toward a firmer, less brittle texture. This is a result of starch retrogradation and vapor redistribution. The preparation performs best when served immediately, while the surface remains fully dry and acoustically responsive.
From a pairing standpoint, the fat content requires a sharp acidic counterbalance. Pickled vegetables, vinegar-based slaws, or a light citrus dressing cut through the coating and reset the palate between bites. In high-humidity environments, the crust softens more rapidly due to ambient moisture absorption. In drier conditions, the crust holds longer but becomes progressively firmer as residual heat dissipates.
Questions
Why does my air fryer chicken turn soggy instead of crisp?
Because excess moisture blocks crisping. When surface water remains, heat transfer shifts into steam, preventing proper surface dehydration. The diagnostic signal is a pale coating that bends under pressure instead of cracking. Chef Tip: Dry the chicken thoroughly until the surface feels slightly tacky before applying the coating.
Can I skip cornstarch and use only flour coating?
No, because flour alone remains elastic. Without cornstarch, the coating forms a flexible layer rather than a brittle crust. The visual cue is a smooth surface without flakes or fracture lines after cooking. Chef Tip: Replace at least one-third of the flour with cornstarch to force a rigid structure.
Why is my coating falling off during air fryer cooking?
Because adhesion was not established before frying. Without a resting phase, coating adhesion remains weak, and steam separates the crust from the meat. The diagnostic signal is loose tactile resistance with coating that shifts before cooking. Chef Tip: Rest coated chicken for 10 minutes until the surface feels slightly bonded and no longer powdery.
Does overcrowding affect crispness in air fryer chicken pieces?
Yes, because airflow becomes restricted. Limited air circulation reduces evaporation and creates localized steam zones. The diagnostic signal is uneven browning with soft, pale areas between pieces. Chef Tip: Maintain at least 2 cm spacing between pieces to preserve consistent airflow.
Why is my crust pale even after full cooking time?
Because oil distribution is insufficient. Without a thin oil film, the Maillard reaction slows and surface browning remains incomplete. The visual cue is a dry, dusty coating instead of a golden crust. Chef Tip: Apply oil evenly as a fine mist to support browning without soaking the coating.
Why does my air fryer chicken cook unevenly inside?
Because heat exposure is inconsistent. Uneven heat transfer occurs when pieces vary in size or are placed unevenly. The diagnostic signal is mixed doneness, with some pieces overcooked and others undercooked. Chef Tip: Use similar-sized pieces and arrange them evenly in the basket for uniform cooking.
Recivelle · /recipe/air-fryer-fried-chicken-crispy-and-healthy