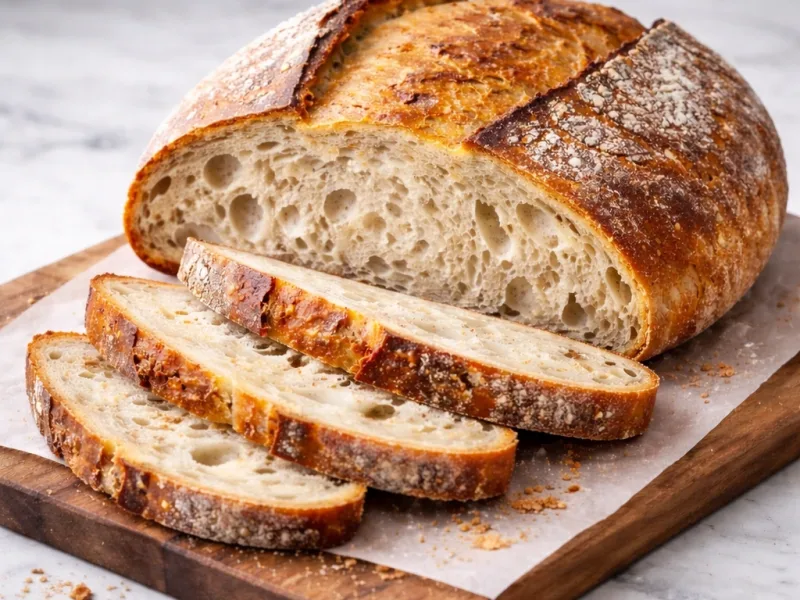
Base recipe: 1 loaf (32 oz / 900 g)
Your kitchen companion
Ingredients
Check off ingredients as you prepare them.
Follow the steps at your own pace.
Method
Combine flour and water: Place 4 cups bread flour (500 g) and 1 ½ cups water (350 ml) in a large mixing bowl. Mix with a wooden spoon until a rough, shaggy dough forms and no dry flour remains.
Incorporate sourdough starter: Add ½ cup active sourdough starter (120 g) to the dough. Mix with clean hands until evenly distributed and the dough becomes cohesive.
Rest the dough: Cover the bowl with a cloth and let the dough rest for 30 minutes at room temperature, ideally 70–75°F (21–24°C). This rest allows flour hydration and begins gluten development.
Add salt: Sprinkle 2 tsp fine sea salt (10 g) over the dough. Fold and press the dough repeatedly for about 2 minutes until the salt dissolves and the dough tightens slightly.
Stretch and fold: Using wet hands, lift one edge of the dough, stretch it upward, and fold it over the center. Rotate the bowl and repeat until four folds are completed.
Repeat folding cycle: Perform the same stretch-and-fold technique every 30 minutes during the first 90 minutes of fermentation. The dough should gradually become smoother and stronger.
Bulk fermentation: Cover the bowl and allow the dough to ferment until 4 hours total fermentation time at 70–75°F (21–24°C). The dough should expand about 50% and feel airy when pressed lightly.
Pre-shape the dough: Transfer the dough to a lightly floured work surface. Fold the edges toward the center to create a loose round. Let the dough rest uncovered for 20 minutes so the gluten relaxes.
Shape the loaf: Form the dough into a tight round boule by pulling it across the work surface to build surface tension. Place it seam-side up in a floured proofing basket or bowl lined with a floured cloth.
Final proof: Cover the basket and proof the dough for 120 minutes at 70–75°F (21–24°C). Alternatively, refrigerate for 12–14 hours at 39°F (4°C) for slower fermentation and stronger flavor development.
Preheat oven: Place a 5–6 quart (4,7–5,7 L) Dutch oven on the middle rack and preheat the oven to 480°F (250°C) for at least 30 minutes so the vessel becomes fully heated.
Score the loaf: Turn the dough onto parchment paper and cut a ½ inch (1 cm) deep slash across the surface with a bread lame or sharp knife to guide expansion during baking.
Bake covered: Carefully transfer the dough into the hot Dutch oven. Cover with the lid and bake for 20 minutes at 480°F (250°C). The trapped steam allows strong oven spring.
Bake uncovered: Remove the lid and continue baking for 20 minutes at 430°F (220°C) until the crust becomes deep golden brown. The bread is fully baked when the internal temperature reaches 205–208°F (96–98°C).
Cool before slicing: Transfer the loaf to a wire rack and cool for 120 minutes before slicing. This cooling period allows moisture redistribution and prevents a gummy crumb.
Extra technique, safety notes and details when you want to go deeper.
More tips & details
Mastering the Art of Slow-Fermented Sourdough
Why This Natural Fermentation Bread Version Works
This recipe expands on the principles of homemade bread by replacing commercial yeast with a mature sourdough starter to unlock deeper flavors and better digestibility. While many beginners feel intimidated by wild yeast, this version provides a reliable, structured workflow for creating a professional-quality artisan loaf in a home kitchen. By shifting from rapid leavening to a long, natural fermentation, the dough develops a complex tang and an elastic crumb that fast-acting yeast simply cannot replicate. This method specifically solves the problem of "flat" home bread by using timed folds to build strength without exhausting the baker.
Key Differences from Standard Yeast Dough
The primary shift in this variation is the move away from instant yeast in favor of a naturally cultivated starter. This change alters the timing and handling of the dough; instead of a quick rise, you will guide the loaf through a multi-hour bulk fermentation where structure is built through gentle folds rather than heavy kneading. This hands-off approach allows the gluten to relax and strengthen naturally, resulting in a more irregular, airy crumb and a thicker, caramelized crust that crackles as it cools—the true hallmarks of artisanal baking.
Achieving a Perfect Crumb and Crisp Crust
Success in sourdough baking depends on balancing dough hydration and fermentation timing. As the dough rests, natural enzymes break down starches into sugars, which eventually create that signature deep-brown crust during the bake. The gentle folding technique traps gas pockets, resulting in a soft interior that feels light and moist. When the dough hits a hot oven—ideally preheated to 480°F (250°C)—the initial burst of steam allows for maximum oven spring, ensuring the loaf expands upward rather than spreading flat.
Serving Suggestions and Daily Enjoyment
Once the loaf has cooled completely, it slices beautifully with a serrated knife without compressing the interior. Because of its sturdy structure and natural acidity, this sourdough is ideal for dipping into olive oil or hearty stews. A thick slice toasted at 355°F (180°C) brings out a toasted wheat aroma that pairs perfectly with salted butter or sharp cheeses. It also provides a robust base for open-faced sandwiches, holding up under heavy toppings while maintaining its signature crisp crust.
Expert Baking Tips from Chef PEKIS
To get the best results, always bake in a fully preheated environment to trigger immediate gas expansion. I highly recommend waiting at least two hours before slicing into your creation; cutting a loaf while it is still steaming releases essential moisture and leads to a gummy texture. When you reach the final shaping stage, focus on creating high surface tension—this acts like a biological balloon, holding the gases in and pushing the dough upward for a dramatic, professional look.
Storing and Refreshing Your Artisan Loaf
Naturally fermented bread stays fresh longer than typical yeast-based loaves because the mild acidity slows down starch degradation. Keep your bread at room temperature in a simple paper bag or wooden bread box for up to 3 days to preserve the crust's integrity. For long-term storage, you can freeze individual slices for up to 2 months in airtight packaging. To bring a slice back to life, heat it in the oven at 355°F (180°C) for about 5–7 minutes until the crust is once again crackling and the center is warm. Avoid the refrigerator, as the cold air will quickly turn the crumb dry and leathery.
Best Sliced at the Table
A loaf of sourdough bread—a naturally fermented loaf made without commercial yeast—reveals its character once the knife moves through the crust. The blade meets a crisp crust that cracks lightly, then passes into a tender crumb that holds its shape while still showing irregular pockets. Fresh slices rest well beside a bowl of soup or a plate of roasted vegetables, where the bread’s mild tang balances richer foods. When placed on a wooden board at the table, the loaf invites slow slicing rather than pre-cut portions.
The aroma is most noticeable when the first slice separates from the loaf. Wheat and fermentation combine into a gentle scent that lingers over the board. Spread with butter or soft cheese, the crumb absorbs flavor without becoming heavy. The crust offers a dry bite at first contact, then softens slightly as it warms against the crumb. This contrast between outer crackle and inner softness remains the most reliable sign that the loaf has matured properly after cooling.
Simple Pairings Through the Day
Morning service often favors thinner slices warmed briefly and served with fruit preserves or honey. The crumb remains resilient even after light toasting, and the crust retains a delicate snap. At midday, thicker pieces support open-faced sandwiches or layered spreads. The structure of the loaf prevents tearing, allowing toppings to rest evenly across the surface.
Later in the day, the bread returns naturally to the center of the table. Broken into rustic pieces, it pairs easily with olive oil, soft cheeses, or seasonal vegetables. The interior stays moist while the crust remains lightly crackling, offering texture without overpowering the meal. Shared this way, the loaf becomes less of a side and more of a quiet centerpiece that carries the familiar rhythm of daily bread.
Questions
Why is my sourdough bread dense instead of airy with open crumb?
Dense sourdough bread occurs when fermentation is incomplete or the starter lacks strength. Wild yeast must produce enough carbon dioxide to expand the gluten network before baking. If the dough rises less than about 50% during bulk fermentation, the crumb structure sets tight in the oven. Proper dough feels elastic, slightly puffy, and shows small surface bubbles before shaping. The loaf should also feel lighter when lifted compared with the initial dough. Chef tip: A healthy starter should double in volume within 4–6 hours at 72–75°F (22–24°C) after feeding.
How do I know when sourdough bread dough is ready to bake?
Sourdough bread dough is ready to bake when it slowly springs back after a gentle finger press. This poke test confirms the dough holds fermentation gas while maintaining structure. If the indentation springs back immediately, the dough is underproofed. If the indentation stays deep and the dough collapses slightly, it is overproofed. Properly proofed dough appears slightly domed and airy with small bubbles visible beneath the surface.
Can sourdough bread be baked without a Dutch oven and still get a crispy crust?
Yes, sourdough bread can develop a crispy crust without a Dutch oven if steam is present in the oven. Steam delays crust formation so the dough can expand before browning. Place a metal tray on the lower rack and pour 1 cup (240 ml) of hot water into it immediately after loading the loaf. This creates the humid environment needed for strong oven spring and crust blistering. Chef tip: Preheat the oven to 480°F (250°C) for at least 30 minutes so the baking surface stores enough heat for strong oven spring.
Why does sourdough bread sometimes taste too sour or acidic?
Overly sour sourdough bread results from extended fermentation or an overly mature starter. Lactic acid bacteria continue producing acids while yeast activity slows, increasing tanginess and slightly darkening the crust. Balanced sourdough should smell mildly tangy with a clean wheat aroma. Shorter fermentation periods or more frequent starter feedings reduce excess acidity and restore a milder flavor profile.
How do I know if a sourdough starter is strong enough for baking bread?
A sourdough starter is ready for baking when it doubles in volume and forms a domed surface filled with bubbles. This signals active wild yeast capable of producing gas to raise bread dough. The aroma should smell pleasantly tangy rather than sharp or alcoholic. A weak starter rises slowly and collapses quickly, which leads to dense bread and limited oven spring. Chef tip: Feed the starter equal weights of flour and water and use it at peak rise around 72–75°F (22–24°C).
Recivelle · /recipe/homemade-sourdough-bread-recipe