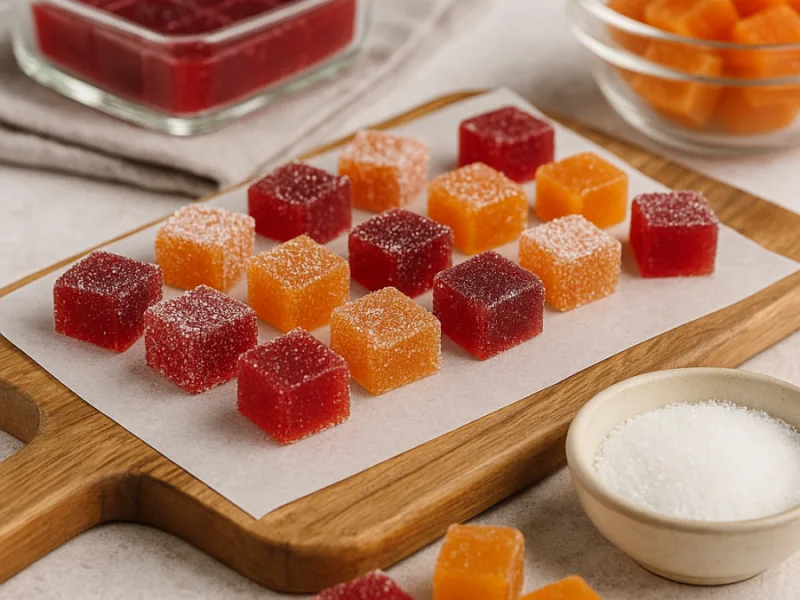
Base recipe: Yields: 40 pieces (approx. 10 servings)
Your kitchen companion
Ingredients
Check off ingredients as you prepare them.
Follow the steps at your own pace.
Method
Prepare your silicone candy molds or line a small baking dish with parchment paper and set aside.
In a medium saucepan, combine the fruit purée and lemon juice. Stir well and place over medium heat.
In a separate bowl, mix the pectin with ½ cup (100 g) of the granulated sugar. This helps prevent clumping.
Add the pectin-sugar mixture to the fruit purée while stirring constantly. Continue stirring until the mixture comes to a boil.
Once boiling, gradually add the remaining sugar (300 g / 1½ cups) to the saucepan, stirring continuously to dissolve.
Continue boiling the mixture over medium heat, stirring constantly, until it thickens significantly and reaches 105°C (220°F) on a candy thermometer. This should take about 20–25 minutes.
Immediately pour the thickened mixture into the prepared molds or lined baking dish. Smooth the surface if necessary.
Let the candy set at room temperature for 90 minutes or until firm and fully cooled.
Once set, remove the candy from the molds or cut into squares if using a dish.
Toss each piece in granulated sugar to coat completely. This prevents sticking and adds texture.
Store in an airtight container at room temperature for up to one week.
Extra technique, safety notes and details when you want to go deeper.
More tips & details
Naturally Sweet Fruit Treats Without Gelatin or Preservatives
What makes homemade fruit candy better than store-bought?
There’s something undeniably nostalgic about the chewy, tangy burst of a fruit-flavored candy—but homemade fruit candy takes the experience to an entirely new level. Free from artificial dyes, excess sugar, and synthetic flavors, this recipe captures the true essence of ripe fruit with a balance of sweetness and acidity that’s perfectly calibrated for the palate. Every bite delivers a clean, bright flavor that’s as vibrant as it is satisfying. The texture? Silky on the tongue, with a soft yet firm chew that melts gently with warmth and leaves a lingering fruit note. If you’re looking for a natural fruit candy recipe that’s both delightful and impressively simple to make, this one stands out with its use of minimal ingredients and maximum taste.
Unlike commercial candies, where fruit is often an afterthought, this recipe centers the fruit—real purées, not concentrates. That makes all the difference. The candy’s color comes from the fruit itself, resulting in elegant hues that reflect their natural source—raspberries yield a soft ruby pink, mangoes a glowing golden tone. The finish is glossy but not sticky, with a firm set that holds beautifully at room temperature, thanks to the carefully balanced sugar-to-pectin ratio. This isn't just another DIY fruit gummy recipe—it’s a handcrafted treat that showcases culinary craftsmanship.
Why readers will love this homemade fruit candy recipe
Beyond the obvious appeal of skipping the artificial ingredients, this recipe offers the rare joy of total customization. You control everything—flavor, sweetness level, shape, and even finish. Want a tart berry chew dusted in sour sugar? Or a soft tropical cube with a whisper of citrus? It’s all possible with this method. The process is straightforward enough for beginners but refined enough to satisfy experienced candy makers. Plus, the easy stovetop cooking method requires no special equipment beyond a thermometer and silicone mold.
These candies are also ideal for gifting, packaging beautifully in glass jars or parchment-wrapped bundles. They store well, maintain their texture for days, and transport easily. Whether you’re preparing for a children’s birthday, a wedding favor box, or simply looking for a healthy fruit snack for kids, this recipe delivers. The fruit-forward flavor profile appeals to all ages, and the candy’s jewel-like finish makes it an eye-catching addition to any dessert table.
What to serve with homemade fruit candy
Because these candies are both versatile and portable, they pair beautifully with a variety of beverages and snack boards. For a casual treat, serve them alongside herbal teas like hibiscus or mint, where the fruitiness complements the gentle floral notes. On a dessert platter, try placing them next to dark chocolate shards, roasted nuts, and dried fruit for contrast in texture and flavor. They also make a stunning garnish on cheesecakes, panna cottas, or even pavlovas—adding color, texture, and natural sweetness in one elegant touch.
At a brunch table, a small bowl of these candies can substitute for jams or syrups—especially citrus varieties like blood orange or grapefruit. For festive occasions, consider pairing with a sparkling prosecco cocktail or a fruit-forward mocktail to match the vibrancy of the candy. If you're hosting, a tray of fruit candies displayed in alternating colors becomes a playful, edible centerpiece. Think of them not only as confections but as flavorful accents that elevate the entire dining experience.
How to choose the best fruit for homemade candy
The flavor intensity of your final candy will only be as good as the fruit you start with. Fresh, ripe fruit yields the best results—especially those high in natural pectin like apples, citrus, and certain berries. For a brighter flavor and cleaner texture, strain purées through a fine sieve before cooking. Frozen fruit can also be used effectively, but make sure to thaw and drain any excess liquid to avoid diluting the final texture.
Stick to varieties with bold natural flavor—raspberries, strawberries, mangoes, blackcurrants, passionfruit. Avoid watery fruits like melons or grapes unless combined with something more structured. For acidity, a squeeze of lemon or lime can sharpen a bland profile and enhance shelf stability. Because this recipe doesn’t rely on added gelatin or cornstarch, the fruit’s pectin and sugar content are key for achieving the proper set—so balance is essential.
Ideal settings for enjoying these fruit confections
These candies are more than just a snack—they’re a mood. They belong in school lunch boxes, on holiday tables, in wedding favor bags, or tucked beside a morning espresso. As a low-calorie dessert option that still satisfies the sweet tooth, they are perfect for mindful eaters. They're also a smart choice for those with dietary restrictions, as they can be made gluten-free, dairy-free, and without common allergens like nuts or eggs.
Hosting a gathering? Add them to charcuterie boards for a surprise pop of color and chew. Need a fun rainy-day project with kids? This is a simple candy recipe for beginners, ideal for involving little hands in pouring molds or dusting sugar. Looking for a last-minute gift? These candies, wrapped in wax paper with a rustic string, feel artisanal and heartfelt.
These are confections that invite play and presence—each batch can reflect the season, the occasion, or the moment’s craving. Whether you're crafting treats for loved ones or indulging your own creativity, this homemade candy recipe brings joy, flavor, and authenticity with every bite.
If you’ve never tried making your own fruit candies before, this is the perfect time to start—save the recipe, share it with friends, or make a batch today and rediscover the magic of real fruit in candy form.
Perfect Your Homemade Candy with Real Fruit: Expert Tips for Better Flavor, Texture, and Shelf Life
Professional techniques for flawless homemade fruit candy
When it comes to making fruit-based candy at home, small details make a big difference. The quality of your fruit purée, the timing of your sugar stages, and the structure of your cooling process will directly impact your final result. A common mistake among home cooks is undercooking the mixture, which prevents the candy from setting correctly. To avoid this, use a digital candy thermometer and aim for exactly 105°C (220°F)—the temperature at which the sugar concentration ensures proper gelation and stability.
To enhance both flavor intensity and color vibrancy, strain your fruit purée through a fine mesh sieve before cooking. This removes excess pulp and seeds, especially for fruits like raspberries or blackberries. The result is a smoother, more polished finish with a consistent texture that slices cleanly or unmolds without sticking. If you want a more concentrated taste, reduce the purée slightly before adding pectin and sugar—this increases the fruit-to-sugar ratio, delivering richer notes and a brighter taste without extra sweetness.
Common mistakes when making fruit candy and how to avoid them
One of the most frequent errors in fruit candy preparation is adding all the sugar at once. This can overwhelm the natural pectin and inhibit its ability to gel. The correct method is to mix pectin with a small portion of the sugar first, then gradually incorporate the remaining sugar once the pectin is activated by heat. This ensures even dispersion and avoids clumping.
Another common issue is skipping the thermometer. Relying on visual cues alone often leads to undercooked or overcooked mixtures. Undercooking results in candies that don’t set and stay sticky; overcooking leads to brittle or overly stiff textures that lose the chewy charm of a well-balanced fruit candy.
Lastly, be cautious when choosing fruit types. Low-pectin fruits like watermelon or pears may require the addition of acid or extra pectin to set properly. Always check the natural pectin content of your fruit and adjust the recipe accordingly to maintain texture integrity.
Healthier alternatives and smart substitutions that keep flavor intact
If you're looking to reduce sugar without compromising taste or structure, a few thoughtful swaps can help. Use fruit with naturally high sweetness like mango, banana, or ripe strawberries, which allow for less added sugar. You can also replace a portion of the sugar with natural fruit syrups such as concentrated apple or pear syrup, which contribute both sweetness and body.
For those avoiding refined sugar, unrefined cane sugar or coconut sugar can be used, though keep in mind they may slightly darken the color and add a caramel undertone. Stevia or erythritol alone won’t work, as they don’t contribute to the necessary crystallization or gelation structure—so avoid using these in traditional fruit candies.
To make this recipe vegan, simply ensure the pectin you use is plant-based and not mixed with gelatin or animal-derived stabilizers. Most commercial citrus pectin is vegan by default, but it’s always worth verifying.
Creative ways to customize your fruit candy recipe
One of the joys of making homemade fruit candy is the ability to personalize flavors and shapes. You can easily switch between fruit types or even blend them for layered complexity. Try pairing raspberry with lychee, mango with passionfruit, or apple with ginger for dynamic flavor profiles.
For added texture and contrast, roll finished candies in freeze-dried fruit powder instead of sugar, or add a dusting of citric acid for a tart finish. You can also infuse the purée with herbs like basil, mint, or thyme during the cooking stage for an elevated gourmet twist.
Consider using silicone molds with themed shapes to reflect seasons or special occasions—hearts for Valentine’s Day, stars for the holidays, or letters for birthday treats. This not only enhances presentation but also adds personalized flair that makes each batch unique.
How each ingredient enhances flavor and function
Each component of this candy recipe plays a critical role in both structure and taste.
- Fruit purée is the heart of the recipe—it determines the flavor, color, and texture. Using ripe, in-season fruit ensures maximum depth and sweetness.
- Granulated sugar acts as both a sweetener and preservative. It binds with pectin and helps the candy firm up to the perfect chew.
- Lemon juice provides acidity that strengthens the gelling properties of pectin and enhances fruit flavor by balancing sweetness.
- Pectin is the setting agent. Commercial pectin extracted from citrus peel ensures that the candy holds its shape and stays firm at room temperature.
- Water helps dissolve the sugar evenly and aids in heat distribution during the cooking process.
Each element must be measured precisely and added in the correct order to yield professional-quality fruit candy that’s shelf-stable, flavorful, and texturally smooth.
Best practices for storage and maintaining texture
Proper storage conditions are essential to maintaining the candy’s texture and preventing spoilage. Once coated in sugar, the candies should be stored in an airtight container at room temperature—away from moisture, sunlight, and heat. This preserves the glossy finish and prevents the sugar from dissolving.
Avoid refrigerating, as humidity can make the candy sticky and alter its set. If you live in a humid climate, consider adding a small food-safe silica packet to your storage container to control moisture. These candies hold up well for 7–10 days, but they’re best enjoyed within the first few days when the texture is at its peak.
To extend shelf life further for gifting or batch preparation, you can air-dry the candies for 24 hours on a parchment-lined tray before coating them in sugar. This creates a thin outer shell that improves structure and preserves freshness longer.
Optional: Understanding the science behind pectin and candy structure
The texture of a well-made homemade fruit chew relies on a delicate balance between pectin, sugar, and acid. Pectin forms a gel when heated with sugar in the presence of acid (usually from lemon juice), creating that signature soft, chewy texture without the need for gelatin.
Timing is crucial: as the mixture heats, water evaporates, and the sugar concentration increases, helping the pectin bond into a stable matrix. Too little heat and the gel won’t form; too much and the structure becomes brittle. This is why precise temperature control is the foundation of consistent candy results—especially when scaling up or adjusting ingredients.
By mastering these interactions, you can confidently experiment with new fruits or flavor pairings, knowing exactly how to balance sweetness, acidity, and structure. Whether you're crafting gourmet candy gifts or simply enjoying a sweet project at home, the result is always worth the effort.
Recivelle · /recipe/homemade-fruit-candy-recipe