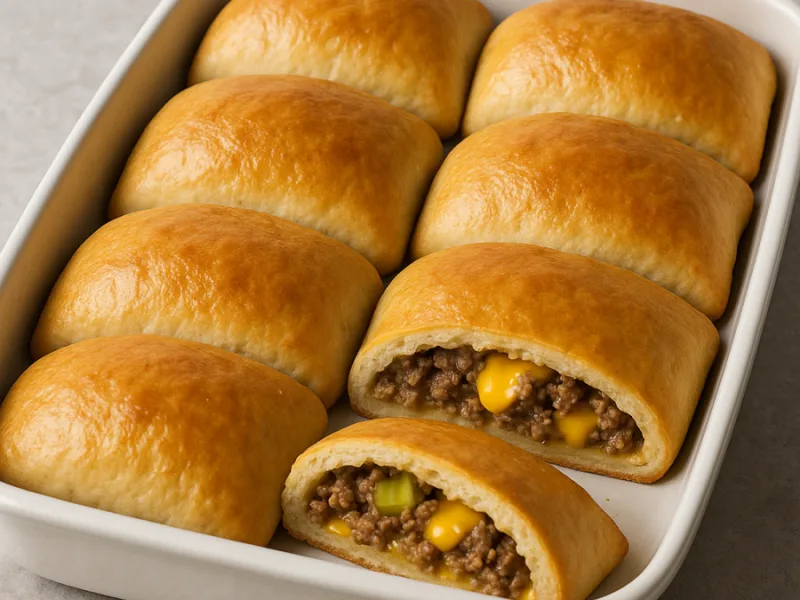
Base recipe: 8
Your kitchen companion
Ingredients
Check off ingredients as you prepare them.
Follow the steps at your own pace.
Method
Prepare the dough: Combine 3 ⅓ cups all-purpose flour (400 g) with 1 ¾ cups Greek yogurt (420 g) in a large mixing bowl. Mix until a smooth dough forms. Add more flour if the dough is sticky or a splash of water if it's too dry. Let the dough rest for 10 minutes, covered.
Cook the beef mixture: Heat a skillet over medium-high heat. Add the chopped onion (100 g) and pickles (60 g). Cook for 3–4 minutes until soft and fragrant. Add ½ lb extra-lean ground beef (250 g), and cook for 4–5 minutes while pressing the meat down with a spatula to create a smash-burger effect. Stir until fully cooked and lightly browned.
Season and sauce the filling: Reduce heat to low. Stir in 2 tbsp light mayonnaise (30 g), 2 tbsp sour cream (30 g), and 3 tbsp ketchup (45 g). Pour in ⅔ cup beef broth (150 ml) and mix well. Season with 1 tsp salt (5 g) and ground black pepper to taste. Simmer for 2–3 minutes until slightly thickened. Remove from heat and let cool slightly.
Portion the dough: Divide the dough into 8 equal pieces. Roll each piece into a smooth ball, then flatten into a circle about 6 inches (15 cm) in diameter on a floured surface.
Assemble the hot pockets: Place a portion of the beef mixture on one half of each dough circle. Add about 2 tbsp shredded light cheddar cheese (12–13 g) on top of the filling. Fold the dough over the filling and press the edges together to seal. Crimp the edges with a fork for a firm seal.
Bake the hot pockets: Preheat the oven to 390°F (200°C). Line a baking sheet with parchment paper. Place the hot pockets on the sheet, leaving space between each. Bake for 20–25 minutes, until golden brown and firm to the touch.
Cool slightly before serving: Remove from oven and let rest for 5 minutes before serving. The filling will settle, and the crust will firm up during this time.
Extra technique, safety notes and details when you want to go deeper.
More tips & details
Best Homemade Cheeseburger Hot Pockets for a High-Protein Meal
What makes high protein cheeseburger hot pockets so satisfying?
The moment you take a bite of these high protein cheeseburger hot pockets, you’ll feel the buttery softness of the golden crust giving way to a juicy, savory center packed with rich beef flavor, tangy pickles, and perfectly melted cheddar. Every pocket is hand-folded and baked to create that irresistible contrast between the crisp outer layer and the warm, creamy filling inside. The beef is seared just like a smash burger, locking in flavor and moisture while adding that deep, umami-laced bite you expect from a perfectly cooked burger.
We spent weeks testing versions of this recipe to strike the perfect balance of protein, texture, and indulgence. The result is a pocket that's not only packed with flavor but also incredibly satisfying and nourishing. Each pocket contains 31 grams of protein, making it a great choice for anyone looking for a healthy comfort food without compromising on taste.
The aroma alone — a blend of seared meat, warm dough, and melty cheese — will transport you straight to your favorite late-night diner or childhood kitchen. But unlike the store-bought versions, these are made from scratch, using whole ingredients that let you enjoy every bite with confidence.
Why you’ll love this cheeseburger hot pocket recipe
The magic of this recipe lies in the harmony of familiar flavors, smart preparation, and nutrient-packed ingredients. Whether you're prepping dinner after a long day or looking for a quick, high protein meal prep idea, this recipe has all the appeal of a fast food favorite but with a fraction of the guilt.
- Taste that hits all the right notes: Think seasoned ground beef, crisp edges, creamy cheddar, and a tangy burger sauce — all enclosed in a soft, golden-brown dough that soaks in every flavor.
- Incredibly satisfying texture: The dough bakes up pillowy yet crisp, while the filling is rich, moist, and loaded with comforting, familiar burger flavor.
- Straightforward, no-fuss method: No yeast, no complicated prep. Just mix, fill, fold, and bake. The dough is made from just two ingredients and comes together in minutes.
- Tested for real life: We’ve baked these dozens of times in different ovens and climates to make sure they’re foolproof. From first-timers to pros, they deliver consistent, delicious results every single time.
- Perfect for all occasions: Weeknight dinners, packed lunches, game nights, post-workout refuels — these pockets fit effortlessly into your routine.
I personally rely on this recipe when I need a fast dinner idea that feels like a treat but still supports my goals. It’s one of those rare meals that everyone at the table agrees on, from picky eaters to the most seasoned food lovers.
What to serve with cheeseburger hot pockets
Pairing these hot pockets with the right sides can turn them into a complete, well-balanced meal or a fun party spread. Here are a few great ideas to serve alongside:
- Crispy oven-baked sweet potato fries – Their natural sweetness contrasts beautifully with the salty, savory beef filling.
- A bright green salad – Something with arugula, cherry tomatoes, and a mustard vinaigrette cuts through the richness and adds freshness.
- Dill pickle spears or slaw – Echo the cheeseburger theme with classic burger sides that add crunch and acidity.
- Roasted vegetables – Broccoli, cauliflower, or Brussels sprouts add fiber and balance the indulgence.
- Greek yogurt dip or high-protein dressing – Perfect for dipping and boosting your protein even more.
Whether you’re enjoying them solo or as part of a spread, these cheeseburger-inspired protein snacks are incredibly versatile.
Can I make these ahead for meal prep or lunchboxes?
Absolutely. One of the key advantages of these high protein hot pockets is their durability. They hold up beautifully in the fridge for several days and can be reheated without losing their signature texture. In fact, we tested several reheating methods and found that a quick air fryer blast restores the crispy edges perfectly — even after a couple of days.
They’re ideal for healthy meal prep lunches, especially for work or school, since they’re fully enclosed and portable. No mess, no fuss, and they stay satisfying longer than most carb-heavy meals.
Even better, they freeze well. Just wrap them tightly once cooled and store for up to a month. A quick bake or reheat brings them back to life.
When should I serve cheeseburger hot pockets?
These are more than just a weeknight fallback. With their crave-worthy flavor and satisfying macros, they shine at a variety of occasions:
- Game day snacks or halftime meals – Serve them cut in half for easy grabbing.
- Family movie nights – They’re fun to eat and hit all the nostalgic notes of childhood comfort food.
- Post-gym meals – High protein and rich in flavor, they help replenish energy without a heavy digestive load.
- Weekend meal prep – Bake a double batch on Sunday and enjoy a full week of stress-free lunches or dinners.
They also make great party food — just slice them into smaller portions and watch them disappear. Few things are as universally liked as the taste of a cheeseburger in a warm, handheld pocket.
What makes this recipe better than frozen hot pockets?
There’s something deeply satisfying about making your own version of a classic cheeseburger hot pocket, especially when it turns out better than the frozen version.
Unlike store-bought options that rely heavily on preservatives, high sodium, and filler ingredients, this version uses whole, recognizable ingredients — lean beef, Greek yogurt dough, light cheese, fresh pickles. The result is a product that feels hearty, fresh, and tailored to your taste and nutritional needs.
The flavor is richer. The texture is cleaner. And the process of making and folding each pocket by hand adds that homemade feel that no frozen food can match. It’s an easy, high protein recipe that delivers way more than convenience — it offers quality and control.
Whether you’re craving something nostalgic, need a quick healthy dinner idea, or just want to impress your guests with something homemade and memorable, these high protein cheeseburger hot pockets are a guaranteed hit. Save the recipe, share it with friends, and enjoy the kind of meal that truly satisfies — inside and out.
Upgrade your homemade stuffed burger pockets with high protein flavor
Creating a memorable homemade stuffed cheeseburger pocket starts with mastering the essentials—flavor, structure, and satisfaction. These high protein cheeseburger hot pockets don’t just replicate fast food—they enhance it with clean, protein-rich ingredients and a deeply comforting bite. With 31 grams of protein per serving, they offer an ideal blend of performance nutrition and homemade comfort. Whether you're prepping for the week or serving a crowd, these pockets deliver big flavor with smart technique and expert balance.
Let’s explore how to elevate your approach to this recipe by refining each element with chef-level insight—from ingredients and texture to storage and serving.
Pro chef tips for perfecting high protein cheeseburger pockets
A high-performance recipe calls for small, strategic refinements that take your pockets from good to unforgettable.
Sear your beef for flavor depth: Instead of browning the beef uniformly, apply a smash-burger technique by pressing portions of meat firmly into the hot pan. This forms a deep crust and adds smoky, caramelized flavor that anchors the entire filling. The crisp outer edge and soft interior contrast beautifully inside the dough.
Control moisture for structure: The filling includes beef broth, sour cream, and light mayonnaise. Stir gently over low heat just until emulsified—overcooking will separate the fats. The goal is a slightly creamy mixture that stays spoonable but not runny. Too much liquid will seep into the dough and compromise the pocket’s crisp finish.
Use Greek yogurt dough while it's fresh: This two-ingredient dough is protein-rich and flexible, but it dries quickly. Always keep it covered while portioning and work in small batches to maintain pliability. The dough should feel soft and elastic—if it cracks, it’s too dry; if it sticks, dust with extra flour.
Seal intentionally: A loose seal can lead to melted cheese leaking out. Use a fork to press down all edges and ensure uniform sealing. Avoid trapping air, which may cause bubbling or splitting during baking.
In my experience, shaping the dough discs first, then letting them rest briefly before filling, makes them much easier to handle. The gluten relaxes just enough to prevent tearing.
What home cooks get wrong when making hot pockets
Even experienced cooks can run into a few avoidable pitfalls when attempting a homemade hot pocket.
Overloading the filling: Too much beef or sauce prevents the dough from sealing properly and leads to bursting. Stick to the measured portion of about 2 heaping tablespoons per pocket—just enough for satisfaction without spillage.
Under-seasoning the beef: While the cheese and sauce offer richness, ground beef needs its own flavor. Salt and black pepper are essential, but don’t be afraid to season the onions and pickles as they cook—layered flavor builds depth.
Skipping the dough rest time: A rushed dough won’t be easy to roll thin, and the pockets will puff inconsistently. A simple 10-minute rest makes a noticeable difference in texture and shaping ease.
Using raw or cold filling: Always allow the cooked beef mixture to cool slightly before assembling. Hot filling can steam inside the dough, making it soggy and prone to breaking.
I’ve learned the hard way that folding too quickly leads to cracks in the seam. Letting the dough relax and filling cool improves your shaping success rate significantly.
How to make cheeseburger hot pockets healthier without losing flavor
If you’re looking for a healthier comfort food option without sacrificing indulgence, these protein-packed pockets are already a great start—but a few thoughtful swaps can go further.
Use nonfat Greek yogurt: This drops fat while maintaining the dough’s structure and protein content. Combined with a leaner filling, it keeps the recipe high in protein and lower in calories.
Try plant-based cheddar alternatives: For a dairy-free version, select a meltable vegan cheese that mimics cheddar’s saltiness and creaminess. Be cautious with volume, as some melt inconsistently and may affect texture.
Swap ground beef with lean turkey or lentils: While ground beef adds classic burger flavor, extra-lean turkey still delivers high protein with less saturated fat. For a vegetarian version, mash seasoned lentils with chopped mushrooms and add a splash of soy sauce for umami.
Make it gluten-free: Use a gluten-free 1:1 flour blend plus 1 teaspoon of xanthan gum to achieve a workable dough with similar elasticity. Shape carefully, as gluten-free dough can be more delicate.
When I substitute turkey, I add a splash of Worcestershire sauce or smoked paprika to boost flavor depth—it keeps that satisfying burger feel even with leaner protein.
Easy and creative recipe variations to try
Once you’ve mastered the basic version, this recipe lends itself to countless twists that match your preferences or dietary needs.
Double cheese pockets: Mix half of the shredded cheddar into the filling before assembly, then top with the remaining portion. It creates a gooey interior with more even cheese distribution.
Spicy cheeseburger pockets: Add chopped jalapeños or a dash of hot sauce to the filling for a zesty kick. Chipotle mayo also works beautifully as a smoky, protein-rich binder.
Breakfast version: Swap the beef for cooked turkey bacon or scrambled eggs and use a bit of mozzarella or Swiss cheese. This transforms the pockets into high protein breakfast pockets perfect for meal prep.
Mini party pockets: Divide the dough into 16 smaller pieces and fill each with half the amount. These make ideal appetizers or game-day snacks—easy to hold and full of bold burger flavor.
What I love about the mini version is how quickly they bake—perfect when I’m entertaining and need something warm and impressive without fuss.
Why every ingredient matters in this high protein recipe
Each element of the recipe serves a specific purpose—understanding this can help you adapt or troubleshoot when needed.
Greek yogurt: Acts as a binder in the dough and adds protein, tang, and elasticity. Full-fat varieties add richness; low-fat versions keep calories in check.
Extra-lean ground beef: Provides protein and authentic burger flavor without excess grease. Smash-searing it helps replicate the Maillard reaction that defines great burgers.
Light mayonnaise and sour cream: Bind the filling and bring creaminess without overwhelming richness. Their balance prevents the mixture from drying out or leaking.
Beef broth: Adds moisture and a savory backbone to the filling. It’s key to blending the beef, pickles, and condiments into one unified, flavorful core.
Pickles and onion: Bring acidity and crunch, cutting through the richness and mimicking the full cheeseburger profile.
When I tested removing the pickles, the pockets felt flat. That briny acidity is surprisingly essential to balance.
Best ways to store and reheat hot pockets without drying them out
Proper storage ensures these pockets remain just as satisfying days later. Done right, they become a versatile part of your weekly high protein meal prep.
Refrigeration: Cool fully, then store in an airtight container for up to 4 days. For best results, layer parchment paper between stacked pockets to prevent sticking.
Freezing: Wrap each cooled pocket tightly in foil or parchment and freeze in a zip-top bag. They’ll stay fresh for 4–6 weeks. Label with the date for easy tracking.
Reheating: – Oven: Bake at 350°F (175°C) for 10–12 minutes if refrigerated, or 20 minutes from frozen. – Air fryer: Heat at 350°F (175°C) for 6–8 minutes until crispy. – Microwave: Wrap in paper towel and heat on high for 90 seconds (not ideal for texture but fast).
Always reheat until the center is hot and cheese is melted. If the dough feels too soft, finish in the oven for 2–3 minutes to restore crispness.
I’ve found the air fryer produces the best balance—quick and crispy without drying out the filling.
Common questions about cheeseburger hot pockets
How do I know when the dough is fully cooked?
The dough should be golden brown on the outside and firm to the touch. Press lightly—if it springs back slightly and there are no pale spots, it’s done.
Can I prep these pockets ahead of time and bake later?
Yes. Assemble the pockets and refrigerate on a tray for up to 12 hours. Let them sit at room temperature for 10–15 minutes before baking to ensure even cooking.
What’s the best way to shape the dough evenly?
Use a kitchen scale to divide the dough into 8 equal portions (about 100 g each). Roll into balls, then flatten into even circles with a rolling pin. Resting the dough 10 minutes before rolling helps tremendously.
How much filling should I add per pocket?
Use about 2 heaping tablespoons of filling plus 2 tablespoons of shredded cheese per pocket. Too much will make sealing difficult and lead to leaks.
What should the filling texture look like before assembling?
It should be thick and cohesive—not watery or oily. It should hold its shape on a spoon and feel slightly creamy but not runny. If it drips, cook it down a little longer.
Recivelle · /recipe/high-protein-cheeseburger-hot-pockets-31g-protein-each