Base recipe: 10 servings
Your kitchen companion
Ingredients
Check off ingredients as you prepare them.
Follow the steps at your own pace.
Method
Warm the milk: Pour 1 cup (240 ml) whole milk into a small saucepan and heat over low heat until it reaches about 95–100 °F (35–38 °C). Test with a kitchen thermometer; the milk should feel warm but not hot to the touch. Remove from heat.
Activate the yeast: Combine the warm 1 cup (240 ml) whole milk, ⅓ cup (80 g) granulated sugar, and 2¼ tsp (7 g) instant dry yeast in a mixing bowl. Stir with a spoon until dissolved. Let the mixture stand for 5 minutes at room temperature until light foam appears on the surface.
Add eggs and vanilla: Crack 2 large eggs into the bowl and add 1 tsp (5 ml) vanilla extract. Whisk until the mixture becomes smooth and evenly combined.
Add flour and salt: Add 3¾ cups (500 g) bread flour and 1 tsp (5 g) salt to the bowl. Mix with a wooden spoon or dough hook attachment until a rough dough forms and no dry flour remains.
Incorporate butter: Add 4 tbsp (60 g) softened unsalted butter to the dough. Knead using a stand mixer with dough hook on medium speed or knead by hand on a work surface for about 10 minutes until the dough becomes smooth and elastic. The dough should stretch slightly without tearing.
First rise: Transfer the dough to a lightly greased bowl and cover with a clean kitchen towel. Let it rise in a warm place around 75–80 °F (24–27 °C) for 60–90 minutes until the dough doubles in volume. A gentle finger press should leave a slight indentation.
Shape the loaf: Punch down the risen dough gently to release trapped gas. Shape it into a tight loaf and place it into a greased 9 × 5 inch (23 × 13 cm) loaf pan.
Second rise: Cover the pan loosely with a towel and let the dough rise for 35–45 minutes at room temperature until the dough expands slightly above the edge of the pan.
Preheat the oven: Set the oven to 356 °F (180 °C). Position the oven rack in the middle to ensure even heat distribution.
Bake the bread: Place the loaf pan in the oven and bake for 30–35 minutes at 356 °F (180 °C). The crust should turn deep golden brown and the internal temperature should reach about 190 °F (88 °C) when tested with a thermometer.
Cool the bread: Remove the loaf from the pan immediately and place it on a wire cooling rack. Allow the bread to cool for 60 minutes before slicing. Cooling stabilizes the crumb structure and prevents compression while cutting.
Extra technique, safety notes and details when you want to go deeper.
More tips & details
Mastering the Enriched Loaf for a Tender Crumb
A Sweet Bread Variation Built on the Classic Method
This preparation adapts the core fermentation and shaping techniques found in our Homemade Bread guide but shifts the focus toward a much softer, slightly sweet finish. By incorporating milk, eggs, and butter, we modify the dough structure to achieve extended freshness and a crumb that stays moist rather than becoming rustic and open. It is the perfect choice for home cooks who need a tender loaf that slices beautifully and remains soft for days. This versatile bread is ideal for 9 × 5 inch (23 × 13 cm) pans and works wonderfully as breakfast toast or soft sandwich bread.
Achieving the Perfect Soft Sandwich Bread Texture
The hallmark of Hawaiian sweet bread is its pillowy crumb, which should compress gently and spring back without any tearing. Once the bread has cooled completely, the interior reveals fine, evenly spaced air cells with the elastic feel of high-quality soft sandwich bread. This structure allows for clean slices roughly 1/2 to 3/4 inch (1 to 1.5 cm) thick that hold their shape even when loaded with heavy spreads. It is particularly effective for lunch sandwiches because the crumb stays flexible at room temperature, while the mild sweetness perfectly complements savory fillings like ham or cheese.
How Enriched Dough Enhances the Baking Process
Because this is an enriched dough, we integrate fat, dairy, and eggs into the base flour and yeast. These ingredients fundamentally change how the bread behaves in the oven. Butter coats the gluten strands to prevent toughness, resulting in a more tender bite. Milk adds lactose and proteins that create a rich, golden crust through better browning, while eggs act as natural emulsifiers to stabilize the dough and ensure a uniform crumb. Since the sugar increases pressure on the yeast, fermentation moves a bit more slowly, making it important to let the dough reach a full rise before baking.
Defining Characteristics of a Tender Sweet Loaf
Once your loaf is baked in its 9 × 5 inch (23 × 13 cm) pan and fully cooled, it displays several characteristics that distinguish it from a standard lean bread:
- Elastic crumb – a soft interior that rebounds when pressed without crumbling.
- Uniform slice structure – fine air pockets that support clean, consistent slicing.
- Golden exterior color – a beautiful crust developed through milk proteins and sugar.
- Moist crumb retention – an interior that remains tender and fresh for several days.
Professional Tips from Chef PEKIS for Success
For the best results, always allow the loaf to cool for at least 60 minutes before slicing; cutting into a warm loaf releases trapped steam and can compress the internal structure. I recommend placing your 9 × 5 inch (23 × 13 cm) loaf pan on the middle oven rack to ensure even heat exposure and balanced browning. Be careful not to over-proof the dough during the final rise; if it expands too far above the pan edge, the gluten may weaken, causing the loaf to collapse slightly during the bake.
Storage Advice and Make-Ahead Preparation
This enriched bread excels at staying fresh because the fats slow down moisture loss. Store the cooled loaf in an airtight container or sealed bread bag at room temperature—it will stay soft for 3 to 4 days when kept between 65–72 °F (18–22 °C). While you can refrigerate it, the cold can eventually make the crumb firmer. For those who want to prepare ahead, you can let the shaped dough ferment in the refrigerator overnight. Just ensure it returns to room temperature before baking so the yeast can reactivate and create that signature pillowy structure.
Soft Slices for Breakfast Tables
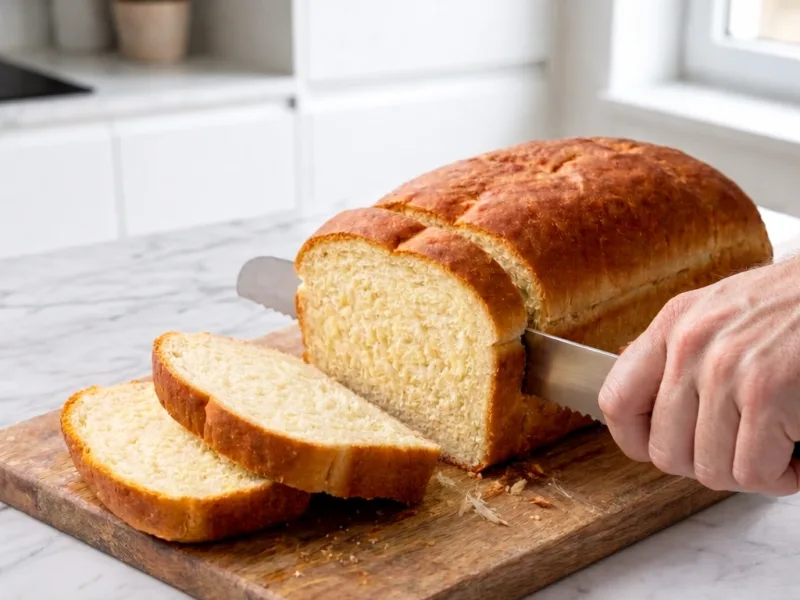
Hawaiian sweet bread appears here as a tender enriched loaf rather than a braided holiday bread or dinner roll. The dough produces a soft interior that cuts into neat slices once cooled. When placed on a board, the loaf releases a light warm aroma of milk and sugar, subtle rather than sugary. The crumb feels flexible between the fingers, showing a gentle spring that signals proper fermentation and balanced moisture.
At the table, the slices hold their structure even with soft spreads. Butter softens immediately across the surface, settling into the small air pockets of the crumb. The crust remains lightly golden and thin, offering just enough resistance before giving way to the interior. This balance makes the bread comfortable beside eggs, fruit, or a simple breakfast plate where mild sweetness works with both sweet and savory sides.
Gentle Sweetness for Everyday Meals
Later in the day, the loaf often moves from breakfast service to casual meals. A slice supports sandwich fillings without cracking because the crumb remains flexible instead of brittle. When pressed lightly, the interior returns to shape, a sign of stable gluten and proper enrichment. The outer surface shows a light golden crust, thin enough that it never dominates the bite.
Served plain on a board or plate, the bread invites simple combinations. Fresh fruit, soft cheeses, or mild cured meats sit comfortably against the slightly sweet crumb. Even when cooled to room temperature, the interior keeps its softness and releases a faint dairy fragrance. The experience remains quiet and steady: balanced sweetness, tender structure, and slices that separate cleanly without tearing.
Questions
Why is my Hawaiian sweet bread dense instead of soft and fluffy?
Dense Hawaiian sweet bread is usually caused by under-fermented dough before baking. The dough must double in volume so yeast produces enough gas to expand the gluten structure and create a soft crumb. Sugar and butter naturally slow fermentation, which means enriched dough often needs slightly longer rising time. If baked too early, the loaf appears heavy with tight crumb pockets. Chef’s tip: After the first rise, press the dough lightly. If the indentation slowly springs back, fermentation is complete.
Why does Hawaiian sweet bread dough feel sticky while kneading?
Sticky dough is normal because milk, sugar, and butter increase moisture and soften gluten formation. As kneading continues, the gluten network strengthens and the dough gradually becomes smoother and more elastic. Adding extra flour too early can produce dry or dense bread. Properly kneaded dough remains slightly tacky but stretches easily. Chef’s tip: Perform a quick stretch test—if the dough stretches 2–3 inches (5–7 cm) without tearing, gluten development is sufficient.
Can Hawaiian sweet bread be made without eggs successfully?
Yes, but removing eggs slightly changes texture and structure. Eggs supply protein and natural emulsifiers that stabilize the crumb and improve softness. Without them, the bread may bake slightly firmer and less elastic. Substituting plain yogurt or a milk-based alternative helps restore moisture and structure. Expect a tender loaf but with a slightly tighter crumb. Chef’s tip: If replacing eggs, add 1–2 tablespoons (15–30 ml) extra milk to maintain dough softness.
Why did Hawaiian sweet bread collapse after baking in the oven?
Bread collapse usually happens when the dough over-proofs during the final rise. When fermentation goes too far, the gluten structure weakens and cannot support the expanding gases during baking. The loaf may rise quickly but sinks as the structure sets. Properly proofed dough should rise just above the pan edge and still feel elastic when touched. Chef’s tip: Lightly press the dough surface; if the indentation slowly returns halfway, the loaf is ready to bake.
Why does Hawaiian sweet bread brown too quickly during baking?
Fast browning happens because sugar and milk accelerate the Maillard reaction, which produces the golden crust. Enriched dough contains more sugars than lean bread, so color develops earlier in the baking cycle. If the oven temperature is too high, the crust darkens before the interior cooks fully. Moderate oven heat ensures balanced browning and proper crumb setting. Chef’s tip: If the crust darkens early, loosely cover the loaf with foil during the last 10 minutes of baking.
Why does Hawaiian sweet bread tear when slicing after baking?
Tearing occurs when the bread is cut before the crumb finishes stabilizing. After baking, internal steam continues redistributing through the starch structure, strengthening the crumb. Slicing too soon compresses the soft interior and causes uneven cuts. Properly cooled bread slices cleanly and shows a smooth crumb pattern. Chef’s tip: Allow the loaf to cool at least 60 minutes before slicing for clean, even slices.
Recivelle · /recipe/hawaiian-sweet-bread-recipe