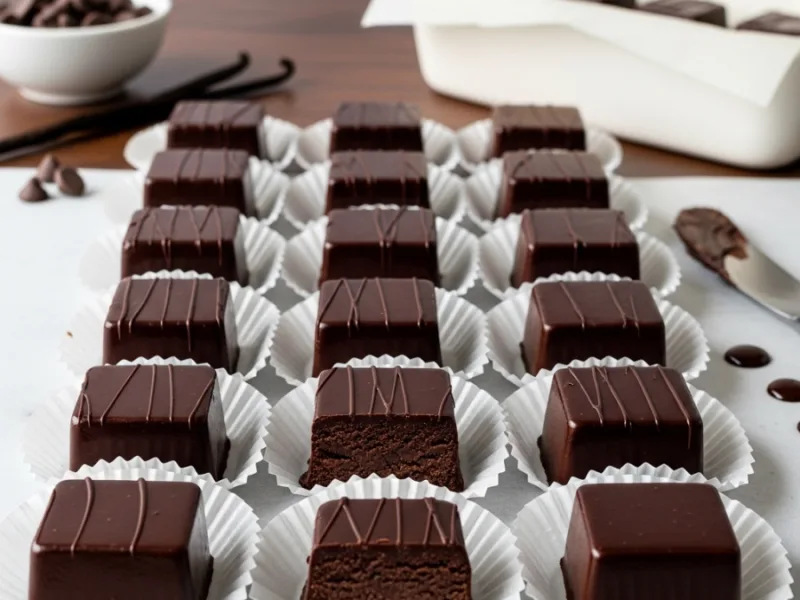
Base recipe: Yields: 20 pieces
Your kitchen companion
Ingredients
Check off ingredients as you prepare them.
Follow the steps at your own pace.
Method
Place the dark chocolate chips in a heatproof bowl.
Set the bowl over a saucepan with simmering water (double boiler method). Make sure the bottom of the bowl does not touch the water.
Stir the chocolate continuously until fully melted and smooth.
Remove the bowl from heat. Immediately stir in the sweetened condensed milk and vanilla extract. Mix thoroughly until the mixture is thick and glossy.
Line a small baking dish or tray with parchment paper.
Pour the chocolate mixture into the prepared dish, smoothing the top with a spatula.
Place the dish in the refrigerator and chill for at least 30 minutes, or until firm.
Once firm, remove from the fridge and lift the chocolate slab out of the dish using the parchment paper.
Cut into bite-sized squares or desired shapes using a sharp knife.
Serve immediately or store in an airtight container in the refrigerator for up to 1 week.
Extra technique, safety notes and details when you want to go deeper.
More tips & details
Irresistible Homemade Chocolate Treats You Can Make in Minutes
Why this 3-ingredient chocolate candy recipe is trending right now
In a world where time is a luxury and simplicity is the ultimate indulgence, 3-ingredient chocolate candy recipes have captured the hearts of home cooks and dessert lovers alike. This recipe doesn’t just meet the demand for quick chocolate desserts—it redefines it. There’s something truly magical about watching three humble ingredients transform into glossy, melt-in-your-mouth confections that rival the finest truffles. Whether you’re preparing a spontaneous sweet treat for guests or indulging in a late-night chocolate craving, this recipe delivers elegance, speed, and flavor in every bite.
What makes these homemade chocolate candies so satisfying
The allure of these easy chocolate bites lies not just in their convenience, but in their luxurious texture and rich, deep flavor. Silky smooth, perfectly snappy at room temperature, and indulgently creamy once bitten into, each piece feels like it belongs in a high-end chocolatier’s case. The key is the perfect balance between quality chocolate, the binding richness of a complementary ingredient, and a final touch that adds complexity—without clutter. It’s this elegant restraint that sets these candies apart from standard chocolate bars or store-bought options. They’re not just sweets; they’re an experience.
Perfect for gifting, entertaining, or self-care moments
When the holidays roll around or you need a last-minute dessert for a dinner party, these no-bake chocolate candies step up beautifully. Presented in delicate paper wrappers or decorative boxes, they become a thoughtful and visually stunning gift. For more casual occasions, arrange them on a wooden board beside fresh berries, roasted nuts, and a glass of dessert wine for a chic dessert platter that’s both effortless and impressive. And when it's just you and a quiet evening, there’s comfort in knowing a batch of homemade chocolate is just ten minutes away.
What to serve with 3-ingredient chocolate candies
Side dishes for chocolate desserts may sound unconventional, but pairing these candies strategically enhances their flavor. A few smart suggestions:
- Fresh fruit: Raspberries, orange segments, or slices of ripe pear balance the richness.
- Espresso or strong black coffee: The bold bitterness of coffee cleanses the palate and enhances the cocoa profile.
- Cheese boards: A soft brie or sharp aged gouda contrasts beautifully with the sweetness and provides a unique gourmet dessert board experience.
- Red wine or port: A bold wine elevates the treat into an elegant post-dinner ritual.
Whether part of a dessert grazing table or a quiet personal indulgence, these candies adapt to any setting.
When to make these candies — and how they fit your lifestyle
One of the best parts about this easy chocolate candy recipe is its flexibility. Need a last-minute hostess gift? Want to prepare something homemade but don’t feel like baking? Or looking for a simple treat to make with kids? This recipe ticks all the boxes. It’s ideal for:
- Holiday candy trays like Christmas, Valentine’s Day, or Easter
- Party favors or table gifts for weddings, birthdays, or showers
- Everyday moments when you want something sweet without the effort
- Meal prep for snacks—store them in the fridge for when cravings hit
With no special tools or baking required, it’s the definition of a low-effort high-reward dessert. Best of all, you’re in control: use dark, milk, or white chocolate to suit your mood, and shape or mold them however you like.
Why this candy recipe is ideal for beginners and experts alike
Despite its simplicity, this recipe provides immense creative satisfaction. For novice cooks, it’s a stress-free entry point into candy-making. You’ll learn the basics of tempering, texture balancing, and flavor harmony—without intimidation. For seasoned pros, this minimalistic approach offers a canvas to explore technique or elevate presentation. The recipe leaves room for personality, yet never sacrifices quality or elegance. You’ll find it quickly becomes a go-to staple—one you can rely on, adapt, and showcase with pride.
How this recipe compares to store-bought candy options
In blind taste tests, these homemade chocolate candies consistently outperform commercial options in freshness, texture, and depth of flavor. Most store-bought chocolates use stabilizers, excess sugar, and preservatives—resulting in a waxy or overly sweet profile. In contrast, these 3-ingredient candies let the chocolate shine, delivering clean, bold cocoa notes and an authentically indulgent finish. It’s a small effort for a massive upgrade.
How long do these candies last, and how to enjoy them best
Though shelf life isn’t the focus here, it’s worth noting these candies can keep well for up to two weeks in a cool, dry place. Their versatility means they can be served in endless ways:
- With an afternoon tea
- As part of a romantic date night dessert board
- In lunchboxes as a tiny sweet surprise
- Or even wrapped individually for a DIY advent calendar
Their presence always feels intentional and refined, no matter the setting.
For anyone who’s ever asked, “What can I make with just a little chocolate?” or searched for a no-fail candy recipe, this is the answer. Save this gem and keep it in your back pocket for those moments when you need a sweet success—fast.
Upgrade Your Homemade Chocolate Candy with Professional Techniques and Expert Enhancements
Chef tips for flawless 3-ingredient chocolate candy every time
Creating chocolate candies with just three ingredients may sound effortless, but professional results come from mastering the details. First and foremost, ingredient quality is non-negotiable. Always choose high-quality dark chocolate (ideally 60–70% cocoa) that melts smoothly and offers a rich, nuanced flavor. Avoid compound chocolate or chocolate chips with added stabilizers, as they can result in a grainy finish.
The method of melting also plays a critical role in the final texture. For glossy, snappy candies, melt the chocolate using a double boiler, not a microwave. The indirect heat allows for controlled melting, preventing overheating or scorching. Stir constantly and ensure no water enters the bowl—just one drop can seize the chocolate.
Temperature control during mixing is equally important. Once melted, stir in sweetened condensed milk only after removing the bowl from heat. Mixing while the chocolate is too hot can cause separation. Aim for a thick, cohesive mixture that holds shape when spread in the pan.
Use parchment-lined molds or dishes for clean release. Let the mixture chill until fully firm—at least 30 minutes—before cutting. For precise presentation, warm your knife slightly before slicing.
Common mistakes to avoid when making 3-ingredient chocolate candy
While the recipe appears deceptively simple, it’s prone to several errors that can affect taste, texture, and appearance. The most frequent mistake is using low-quality chocolate with excessive sugar or stabilizers. This not only dulls the flavor but often leads to a gritty or waxy texture.
Another misstep is melting chocolate too quickly. Microwaving at high power may seem faster, but it risks uneven heating and burning. Once chocolate burns, it’s unusable—there’s no recovery.
Be cautious with your ratios. Too much sweetened condensed milk makes the mixture overly soft and sticky. On the other hand, too little will prevent proper blending and set. Always measure carefully using weight for the most accurate results.
Finally, don’t rush the chilling step. Cutting the candy before it’s completely set leads to jagged edges and smearing. For best results, chill for a full 30–45 minutes and use a clean, sharp knife wiped between cuts.
Healthy substitutions and allergen-friendly ingredient swaps
For those with dietary restrictions or preferences, this recipe adapts beautifully without compromising flavor or texture. To make dairy-free chocolate candy, use coconut-based sweetened condensed milk—readily available in health food stores. It provides a subtle tropical undertone and keeps the mixture smooth and cohesive.
When choosing chocolate, ensure it’s labeled dairy-free or vegan if required. Many dark chocolates are naturally dairy-free, but always verify. For a gluten-free version, all ingredients used in the base recipe are inherently gluten-free, but cross-contamination can occur. Opt for certified gluten-free products to ensure safety.
For a reduced-sugar option, use sugar-free dark chocolate combined with unsweetened condensed coconut milk and a natural sweetener such as erythritol. While texture might slightly differ, the end result still satisfies chocolate cravings with fewer carbs.
Flavor twists and creative variations for chocolate candy
Even with just three ingredients, this recipe offers ample room for customization. Try infusing the vanilla extract with a different flavor essence, like almond, orange, or peppermint. A few drops dramatically alter the profile without changing texture.
Swirl in nut butter (like peanut or hazelnut) for a richer, creamier candy. Add-ins like chopped toasted nuts, crushed freeze-dried fruit, or crisped rice create texture contrast and enhance visual appeal. Sprinkle flaky sea salt on top just before chilling for a sweet-salty finish.
For a festive touch, press mini marshmallows or sprinkles into the surface before setting. To elevate the presentation, pour the mixture into silicone molds to create polished shapes—perfect for gifting or party trays.
Ingredient benefits: Why these 3 components work so well
The synergy between chocolate, sweetened condensed milk, and vanilla extract lies in both their function and flavor. Dark chocolate is rich in cocoa solids and cocoa butter, providing depth, natural antioxidants, and the firm structure needed for slicing.
Sweetened condensed milk brings more than sweetness—it acts as a binding agent, ensuring a dense, fudge-like consistency. Its slow-cooked milk sugars contribute a caramelized undertone that balances the bitterness of dark chocolate.
Vanilla extract enhances chocolate’s complexity by adding floral and sweet notes, even in small quantities. It rounds out sharpness and brings aromatic warmth to each bite. Together, these three ingredients create a treat that feels much more sophisticated than its simplicity suggests.
How to store and serve homemade chocolate candies
Proper storage is essential to maintain the texture and freshness of your candies. Once cut, place them in a single layer inside an airtight container. Refrigerate if your environment is warm or humid, especially in summer months. Chilling extends shelf life up to one week without affecting flavor.
To prevent condensation, allow refrigerated candies to come to room temperature inside the container before opening. This avoids moisture build-up that could dull the surface or cause stickiness.
For longer-term storage, these candies can be frozen for up to 2 months. Wrap pieces individually in parchment or wax paper and store in a sealed freezer-safe container. Thaw in the fridge overnight or at room temperature for 30–60 minutes.
When serving, consider presentation. Use decorative paper cups, chocolate boxes, or display them on a marble slab with berries and nuts for a dessert board centerpiece. Their polished finish and deep color make them perfect for both casual snacking and elegant entertaining.
Why homemade chocolate candies surpass store-bought options
Most commercial chocolate candies are designed for shelf stability, not peak flavor or texture. They often contain emulsifiers, artificial flavors, and preservatives that detract from the richness and purity of real chocolate.
By contrast, homemade versions using just three clean ingredients deliver an unparalleled experience. The chocolate tastes fresher, the texture is softer and more satisfying, and you control every aspect of the recipe—from sweetness level to shape and size.
Moreover, homemade candies offer customization that brands can’t match. Whether adapting for dietary needs, flavor preferences, or creative flair, these chocolates can be tailored to any occasion. It's an excellent example of how minimalism in the kitchen can lead to maximum enjoyment.
Save this recipe as your go-to when you need a quick chocolate fix that feels indulgent and impressive without the stress.
Recivelle · /recipe/easy-chocolate-candy-recipe-just-3-ingredients