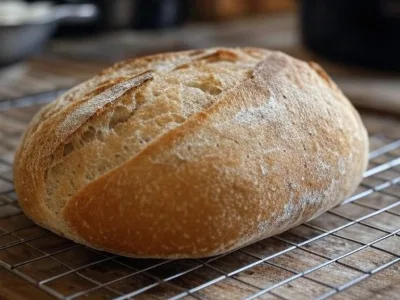
Base recipe: Makes 1 loaf (approximately 8 slices)
Your kitchen companion
Ingredients
Check off ingredients as you prepare them.
Follow the steps at your own pace.
Method
Mix the Dough In a large mixing bowl, combine flour, salt, and dry yeast. Gradually add lukewarm water, stirring with a wooden spoon until a shaggy dough forms. The dough will be sticky—this is normal.
Let It Rest Cover the bowl with a clean kitchen towel or plastic wrap. Leave the dough to rest at room temperature for 12 to 18 hours. During this time, the yeast will ferment, creating air bubbles and developing flavor.
Preheat the Oven and Dutch Oven Place a Dutch oven (or heavy oven-safe pot with a lid) in your oven and preheat to 230°C (450°F). Preheating the pot ensures a crispy crust.
Shape the Dough After the resting period, lightly flour a clean surface and your hands. Turn the dough out onto the surface, shape it into a rough ball, and let it rest for another 30 minutes.
Bake the Bread Carefully remove the preheated Dutch oven from the oven. Place the dough ball onto a piece of parchment paper and lower it into the pot. Cover with the lid and bake for 30 minutes.
Remove the Lid After 30 minutes, remove the lid to allow the crust to develop a deep golden-brown color. Bake for an additional 10-15 minutes.
Cool and Serve Carefully remove the bread from the Dutch oven and let it cool on a wire rack for at least 30 minutes before slicing.
Extra technique, safety notes and details when you want to go deeper.
More tips & details
There’s something truly magical about baking your own bread at home. The aroma that fills your kitchen, the crackling crust fresh out of the oven, and the joy of slicing into a perfectly golden artisan loaf—all made possible with a recipe so simple, it feels like a secret. This no knead artisan bread recipe is your ticket to mastering bakery-quality bread without any complicated techniques or special equipment.
With just a handful of pantry staples, minimal effort, and a bit of patience, you’ll create a rustic, crusty loaf that’s as beautiful as it is delicious. Whether you’re an experienced baker or a total beginner, this recipe will become your go-to for bread that impresses every single time.
Why You’ll Love This No Knead Artisan Bread Recipe
Effortless to Make
Forget about tedious kneading and long hours in the kitchen. This no knead bread recipe requires only a few minutes of active preparation, making it ideal for busy schedules or lazy weekends. Simply mix the ingredients, let time do the work, and enjoy the rewarding process of baking bread from scratch.
Perfectly Crispy Crust and Tender Crumb
The secret to this bread’s artisan-quality crust lies in baking it in a preheated Dutch oven. The high heat creates a stunningly crisp exterior, while the inside remains soft, airy, and full of flavor. Each bite is a delightful contrast of textures that’s hard to resist.
Versatile and Customizable
Whether you enjoy your bread with butter, use it as a base for sandwiches, or pair it with soups and stews, this recipe is endlessly versatile. You can also experiment by adding your favorite herbs, seeds, or even cheese to the dough for a personalized twist.
What Makes This No Knead Bread Recipe So Special?
Simplicity at Its Best
This recipe strips bread-making down to its essentials. With only four ingredients—flour, water, salt, and yeast—you’ll achieve results that rival the best artisan bakeries. The no-knead method relies on a long fermentation process, allowing the dough to develop deep, complex flavors while you go about your day.
Perfect for Beginners and Experts Alike
You don’t need fancy tools or professional skills to make this bread. Whether you’re trying your hand at bread-making for the first time or you’re a seasoned baker looking for a quick recipe, this easy artisan bread recipe delivers exceptional results with minimal effort.
A Timeless Classic
Artisan bread never goes out of style. Its rustic charm, hearty flavor, and visual appeal make it a centerpiece for any meal. Serve it warm with a smear of butter, alongside a charcuterie board, or as an accompaniment to your favorite pasta dish—it’s a crowd-pleaser every time.
The Secret to Success: Patience and Heat
The beauty of this recipe lies in its simplicity, but the true magic happens during the long rise time. Allowing the dough to rest overnight at room temperature gives the yeast time to work its magic, creating a beautifully bubbly, hydrated dough. The result? A loaf with a light, airy interior and the signature chew of artisan bread.
Baking the dough in a preheated Dutch oven traps steam, mimicking the environment of a professional bread oven. This process ensures your bread develops that iconic golden crust while staying moist and tender inside.
Bring Bakery-Quality Bread to Your Home
There’s no need to run to the bakery when you can create bread that’s just as impressive right in your own kitchen. Once you try this no knead artisan bread recipe, you’ll wonder how you ever lived without it. The satisfaction of baking your own loaf, paired with the incredible flavor and texture, is unmatched.
Your Turn to Bake
Are you ready to elevate your home baking game? Grab your ingredients, follow this simple recipe, and let the magic unfold in your oven. Whether you’re baking for your family, hosting a dinner party, or treating yourself, this artisan bread is the perfect addition to any occasion.
Don’t wait—start your journey to effortless bread-making today. Your kitchen will smell amazing, your taste buds will thank you, and you’ll have a loaf so good, you’ll want to bake it again and again.
Tips to Perfect the Easiest No Knead Artisan Bread Recipe
Mastering this no knead artisan bread recipe is about understanding the ingredients, techniques, and possible variations. Small tweaks can significantly impact the flavor, texture, and appearance of your bread. Here are detailed tips and insights to help you customize and elevate this already amazing recipe.
How Changes in Ingredients Affect Flavor and Texture
Flour Choices
The type of flour you use can drastically change the bread’s characteristics:
- All-Purpose Flour: This recipe calls for all-purpose flour, which provides a balanced texture and mild flavor. Perfect for beginners.
- Bread Flour: Substituting with bread flour (higher protein content) results in a chewier texture and improved gluten structure, which can create larger air pockets in the crumb.
- Whole Wheat Flour: Replacing up to 50% of the all-purpose flour with whole wheat flour introduces a nuttier flavor and denser texture. Since whole wheat absorbs more water, you may need to increase the liquid slightly (by about 10-20 ml or 1-2 tbsp).
- Gluten-Free Flour: Use a gluten-free blend designed for bread-making. Adding 1 tsp of xanthan gum will mimic gluten’s elasticity, though the texture will still be less airy than traditional flour.
Adjusting Salt
Salt isn’t just about flavor; it also impacts gluten structure and yeast activity.
- More Salt: Adding an extra pinch can enhance flavor but may slightly slow fermentation.
- Less Salt: Reducing salt creates a softer crumb but may result in a less flavorful loaf.
Yeast Variations
- Dry Active Yeast vs. Instant Yeast: Both work well, but if using dry active yeast, activate it in lukewarm water before mixing. Instant yeast can be mixed directly with the flour.
- More Yeast: Doubling the yeast reduces fermentation time but may lead to a less developed flavor.
- Natural Yeast (Sourdough Starter): Using a sourdough starter instead of commercial yeast adds complexity and tanginess. Replace the yeast with 120 g of active sourdough starter and adjust the water and flour accordingly.
Techniques to Enhance Crust and Crumb
Hydration Levels
Hydration (water-to-flour ratio) determines how open the crumb is:
- Higher Hydration (75-80%): Results in a more open crumb with larger air pockets, but the dough becomes stickier and harder to handle. Add 20-30 ml (2-3 tbsp) more water for this effect.
- Lower Hydration (60-65%): Creates a denser loaf that’s easier to shape but with a tighter crumb structure. Reduce water slightly if aiming for this texture.
Fermentation Time
- Long Fermentation (18+ Hours): Enhances flavor complexity as yeast and bacteria break down starches. Perfect for rich, tangy loaves.
- Short Fermentation (8-10 Hours): Still yields good results but with a milder taste. Ideal if you’re short on time.
Baking Adjustments for a Perfect Crust
Dutch Oven Tricks
- Preheat Thoroughly: Always preheat the Dutch oven to ensure the loaf develops a crackling crust.
- Use Parchment Paper: Makes transferring the dough into the pot easier and prevents sticking.
- Steam: If you don’t have a Dutch oven, create steam in your oven by placing a pan of water on the bottom rack. The steam enhances crust development.
Oven Temperature
- Higher Temperature (240°C / 465°F): Promotes a thicker, crunchier crust but risks overbrowning.
- Lower Temperature (220°C / 430°F): Produces a softer crust with less browning.
Flavor Additions and How They Change the Bread
Herbs and Spices
- Rosemary and Thyme: Add fresh or dried herbs to the dough for a Mediterranean flair.
- Garlic Powder: Introduces a savory, slightly sweet depth of flavor.
- Cumin or Caraway Seeds: Perfect for pairing with soups or stews, adding an earthy aroma.
Seeds and Grains
- Sesame Seeds: Add to the dough or sprinkle on top for a nutty crunch.
- Flax or Chia Seeds: Enhance nutritional value and provide a slightly nutty flavor.
- Oats: Sprinkle on top of the loaf for a rustic appearance and subtle sweetness.
Sweet or Savory Variations
- Cheese: Incorporate shredded cheddar, Parmesan, or Gruyère for a rich, cheesy flavor.
- Dried Fruits: Add raisins, cranberries, or chopped apricots for a sweet twist.
- Nuts: Walnuts, almonds, or pecans contribute crunch and complexity.
Tips for Shaping and Scoring
- Shaping: Handle the dough gently to retain the air bubbles formed during fermentation. A light touch ensures a more open crumb.
- Scoring: Use a sharp knife or razor blade to score the top of the loaf. This allows controlled expansion during baking and creates a beautiful decorative effect.
Substitutions for Special Diets
- Gluten-Free: Use a gluten-free flour blend and xanthan gum for structure.
- Low-Sodium: Reduce salt to ½ tsp and consider adding herbs or spices for flavor.
- High-Protein: Replace part of the flour with high-protein alternatives like chickpea or spelt flour for a denser, more nutritious loaf.
This recipe is endlessly adaptable, making it a great starting point for experimenting with flavors, textures, and techniques. By tweaking the ingredients, fermentation time, and baking method, you can create a loaf tailored to your preferences. Each adjustment tells a story—one of rustic simplicity, culinary creativity, and the joy of baking something truly special at home.
Recivelle · /recipe/easiest-no-knead-artisan-bread-recipe