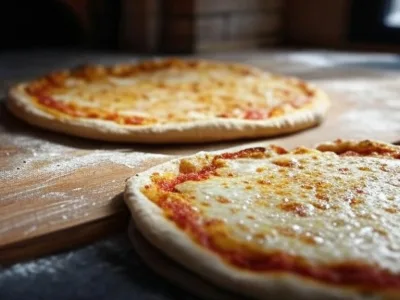
Base recipe: This recipe makes enough dough for 4 medium-sized pizzas (approx. 25 cm diameter) or 2 large pizzas (approx. 35 cm diameter).
Your kitchen companion
Ingredients
Check off ingredients as you prepare them.
Follow the steps at your own pace.
Method
Step 1: Prepare the Dough
Activate the Yeast: In a small bowl, mix lukewarm water with the yeast and a pinch of flour. Let it rest for 5–10 minutes until bubbles form, indicating the yeast is active.
Combine Ingredients: In a large mixing bowl, combine the flour and salt. Gradually pour in the yeast mixture, mixing with a wooden spoon or your hand.
Add Olive Oil: Add the olive oil and continue mixing until the dough starts to come together.
Knead the Dough: Transfer the dough to a floured surface. Knead for about 8–10 minutes until smooth, elastic, and slightly sticky.
Step 2: First Rise
Place the dough in a lightly oiled bowl, cover it with a clean kitchen towel or plastic wrap, and let it rise at room temperature for 1–2 hours or until it doubles in size.
For better flavor, refrigerate the dough for 12–24 hours (optional). Before using, allow the dough to come to room temperature for at least 30 minutes.
Step 3: Shape the Dough
Divide the dough into equal portions (2 for large pizzas or 4 for medium pizzas).
Shape each portion into a ball. Cover and let them rest for 20 minutes to relax the gluten.
Step 4: Roll Out the Dough
On a floured surface, gently flatten each ball with your hands or a rolling pin to your desired thickness.
Transfer the rolled dough to a pizza peel or baking tray lined with parchment paper.
Step 5: Assemble and Bake
Preheat the Oven: Preheat your oven to its maximum temperature (250°C/480°F or higher). If using a pizza stone, place it in the oven to heat thoroughly.
Add Toppings: Spread a thin layer of tomato sauce over the dough, leaving a small border. Add cheese and other desired toppings.
Bake: Bake the pizza for 10–15 minutes until the crust is golden and crisp, and the cheese is bubbly.
Extra technique, safety notes and details when you want to go deeper.
More tips & details
Creating the perfect pizza starts with an exceptional pizza dough. This recipe brings the heart of Italian cuisine to your home, allowing you to craft pizzas with a golden, crispy crust and a tender, airy interior. Whether you're hosting a family gathering, celebrating a special occasion, or simply indulging in a midweek treat, this authentic Italian pizza dough recipe is your ticket to culinary perfection.
The charm of this recipe lies in its simplicity and authenticity. Made with just a few basic ingredients, it captures the essence of traditional Italian pizza-making. You'll discover how easy it is to transform pantry staples like flour, water, yeast, and olive oil into a restaurant-quality pizza base.
Why You'll Love This Recipe
- Authenticity: This recipe replicates the traditional techniques used in Italian pizzerias for centuries.
- Versatility: The dough is perfect for various toppings, whether you prefer classic margherita, spicy pepperoni, or innovative vegetarian combinations.
- Ease of Preparation: With a step-by-step guide, even beginners can master this dough with confidence.
- Superior Flavor: The long fermentation time allows the flavors to deepen, delivering a rich, complex taste.
- Cost-Effective: Save money by making your pizza at home without compromising on quality.
Why Homemade Pizza Dough is Worth It
Store-bought pizza bases can never replicate the freshness and flavor of homemade dough. Making it from scratch gives you full control over the ingredients, ensuring a healthier, more personalized outcome. Additionally, the process of kneading and rising the dough is immensely satisfying, connecting you to the roots of Italian cooking.
What Makes This Dough Special?
The secret to this perfect pizza dough is its fermentation process. By allowing the dough to rise slowly, you achieve a texture that’s both chewy and airy, while also developing a robust flavor profile. The result is a pizza crust that’s crisp on the outside and tender on the inside—a balance that’s often hard to achieve with store-bought options.
This recipe works beautifully in any home kitchen, whether you use a pizza stone, a steel plate, or a standard oven tray. The flexible nature of the dough ensures that even without professional equipment, you’ll achieve incredible results.
Tips for the Best Results
- Choose Quality Flour: For authentic results, use type "00" flour, known for its fine texture and low protein content, ideal for pizza dough.
- Measure Accurately: Baking is a science. Precise measurements will ensure consistent results.
- Allow Time for Fermentation: A slow rise enhances the dough's flavor and texture, so don’t rush this step.
- Preheat Your Oven: A hot oven is crucial for achieving the perfect crust, mimicking the high temperatures of traditional pizza ovens.
- Experiment with Hydration: Adjusting the water content slightly can help you achieve the dough texture you prefer—soft and airy or slightly denser.
Make Your Pizza Night Memorable
Imagine pulling a perfectly baked pizza out of your oven—the crust golden and crisp, the aroma of freshly baked dough filling your kitchen. As you slice into it, you’ll hear the satisfying crunch of the crust, followed by the delightful softness inside. This pizza dough recipe ensures every bite is a celebration of flavor and texture, leaving you and your guests craving more.
Why wait? Gather your ingredients, roll up your sleeves, and dive into the art of pizza-making. Your journey to mastering the perfect Italian pizza dough begins here. Indulge in the satisfaction of creating something truly delicious, right in your own home.
This authentic Italian pizza dough recipe isn’t just about making pizza—it’s about embracing a tradition, sharing joy, and creating memories. Perfect for any occasion, this dough will elevate your pizza game to new heights.
Expert Tips and Variations for Perfect Italian Pizza Dough
Unlocking the Secrets of Authentic Pizza Dough
Mastering the art of making authentic Italian pizza dough goes beyond following a recipe. By tweaking ingredients, techniques, and timings, you can significantly enhance the texture, flavor, and workability of your dough. Whether you’re aiming for a crispy crust, a soft interior, or experimenting with new flours, these expert tips will elevate your pizza-making skills.
The Role of Each Ingredient and How to Adjust
Flour: The Foundation of Pizza Dough
- Type of Flour:
Traditional "00" flour is preferred for its fine texture and low protein content, making the dough elastic and easy to work with. Substitution Tip: Use all-purpose flour for a slightly denser crust or whole wheat flour for a nuttier flavor and added fiber. Note that whole wheat flour absorbs more water, so slightly increase hydration for a smoother dough.
- Protein Content:
High-protein flours (like bread flour) yield a chewier crust. For a light, airy texture, stick to lower-protein flours like "00".
Water: Hydration Matters
- Water Temperature:
Lukewarm water, approximately 38°C (100°F), is ideal for activating yeast. Cold water slows fermentation, while hot water can kill yeast. Hydration Levels: Adjust hydration for your desired dough texture. Higher hydration results in a softer dough with an open crumb but requires careful handling.
Yeast: The Heart of Fermentation
- Active Dry vs. Fresh Yeast:
This recipe uses 7 g (2 ¼ tsp) of active dry yeast, but you can substitute it with 25 g (0.88 oz) of fresh yeast for a subtler flavor. Fresh yeast needs to be dissolved in water before mixing. Extended Fermentation: For deeper flavor, reduce yeast to half and allow a slower fermentation (12–24 hours in the fridge). This process develops complex flavors and enhances digestibility.
Olive Oil: Adding Flavor and Elasticity
- Impact on Texture and Flavor:
Olive oil increases elasticity, making it easier to stretch the dough, and adds a rich, subtle flavor. Experiment with Flavored Oils: Use garlic or herb-infused olive oil to introduce unique flavor profiles to your dough.
Salt: Enhancing Taste and Dough Structure
- Balancing Flavor:
Use 10 g (2 tsp) of fine sea salt to boost flavor and regulate yeast activity. Too little salt results in bland dough, while too much slows fermentation.
Techniques to Improve Texture and Flavor
Kneading: Developing Gluten
Kneading builds a strong gluten network, ensuring elasticity and chewiness.
- Knead for 8–10 minutes by hand or 5–6 minutes in a stand mixer.
- Pro Tip: Perform the windowpane test to check readiness. Stretch a small dough portion—if it forms a thin, translucent sheet without tearing, it's ready.
Resting: Allowing Gluten to Relax
After shaping, let the dough rest for 20–30 minutes to relax the gluten. This step makes stretching easier and enhances flavor development.
Variations for Creative Pizzas
Experimenting with Dough Flavors
- Herb-Infused Dough: Mix 1–2 tsp of dried herbs (e.g., oregano or thyme) into the flour for a fragrant dough.
- Garlic-Infused Dough: Incorporate minced garlic or garlic powder for a bold flavor twist.
Gluten-Free Option
Replace all-purpose flour with a gluten-free blend, adding 1 tsp of xanthan gum if not already included. Gluten-free dough requires less kneading and will have a slightly different texture.
Whole Wheat or Spelt Flour
Substitute up to 50% of the flour with whole wheat or spelt flour for a nutty flavor and denser crust. Increase hydration slightly (add 10–20 ml) to compensate for higher water absorption.
Temperature Control for Baking Perfection
High Heat for Authentic Crust
Preheat your oven to its maximum temperature (250°C/480°F or higher) to mimic a professional pizza oven. A pizza stone or steel retains heat well, ensuring a crispy crust.
Alternative Methods
If a pizza stone is unavailable, preheat an upside-down baking tray for similar results. This method creates a crispy base while maintaining a soft interior.
Troubleshooting Common Issues
Sticky Dough
Gradually add small amounts of flour (1 tbsp at a time) while kneading until the dough becomes manageable. Avoid over-flouring, as it can result in a dry, tough crust.
Dough Won’t Stretch
If the dough resists stretching, let it rest longer. Overworked gluten tightens, making the dough difficult to shape.
Dense Crust
A dense crust can result from under-proofing or over-kneading. Ensure the dough doubles during the first rise, and avoid overworking before shaping.
How Adjustments Affect the Final Pizza
Thin vs. Thick Crust
- For a thin, crispy crust, roll the dough thinner and bake at a higher temperature for a shorter time.
- For a thicker crust, roll less thinly and bake slightly longer at a lower temperature.
Chewy vs. Tender Texture
- Use higher-protein flours and longer kneading for a chewy crust.
- For a tender crust, shorten kneading and resting times.
Perfecting Your Pizza Dough
This authentic Italian pizza dough offers endless opportunities for customization. By experimenting with ingredients and techniques, you can achieve a dough that aligns perfectly with your preferences. Whether you stick to tradition or introduce creative twists, this recipe ensures you’ll enjoy the flavors of Italy in every bite.
Recivelle · /recipe/authentic-italian-pizza-dough-recipe-perfect-crust-every-time