Base recipe: 12 servings
Your kitchen companion
Ingredients
Check off ingredients as you prepare them.
Follow the steps at your own pace.
Method
Mix the dry ingredients: In a large mixing bowl combine 3 ½ cups (500 g) bread flour, 2 ¼ tsp (7 g) instant dry yeast, and 1 ¾ tsp (10 g) fine sea salt. Stir with a whisk or spoon for about 20 seconds until evenly distributed.
Add the liquids: Pour in 1 ¾ cups (420 ml) water and 2 tbsp (30 ml) olive oil. Stir using a sturdy spoon or silicone spatula until all flour is hydrated and a sticky dough forms. The mixture should appear loose and slightly shaggy.
Rest the dough: Cover the bowl with plastic wrap or a clean towel and let the dough rest at room temperature for 20 minutes. This rest allows flour hydration and early gluten formation.
Strengthen the dough: Perform one stretch-and-fold inside the bowl. With damp hands lift one side of the dough and fold it over itself. Rotate the bowl and repeat four times. This strengthens gluten without kneading.
Ferment the dough: Cover the bowl again and allow the dough to rise at room temperature between 72–75°F (22–24°C) for 60–90 minutes. The dough should double in size and show visible bubbles on the surface.
Prepare the baking pan: Pour 1 tbsp (15 ml) olive oil into a 9 × 13 inch pan (33 × 23 cm). Spread evenly across the base and sides using a brush or your fingertips.
Transfer the dough: Gently move the dough into the oiled pan using a spatula. The dough will spread slowly. Lightly stretch it toward the edges without pressing out the bubbles.
Second rise: Cover the pan loosely and allow the dough to rise for 30 minutes at room temperature. The dough should expand and feel airy when lightly touched.
Preheat the oven: Heat the oven to 430°F (220°C) using conventional bake mode. Position the rack in the center of the oven. Proper preheating ensures rapid oven spring.
Create the dimples: Drizzle the remaining 1 tbsp (15 ml) olive oil evenly over the dough. Press your fingertips straight down across the surface to form deep dimples. Sprinkle 1 tsp (2 g) dried rosemary and ½ tsp (3 g) coarse sea salt over the surface.
Bake the focaccia: Place the pan on the middle oven rack and bake for 20–25 minutes at 430°F (220°C). The bread is done when the top is golden brown, the edges appear crisp, and the underside sounds hollow when tapped with a spatula.
Cool before cutting: Remove the pan from the oven and transfer the bread to a cooling rack using a spatula. Allow it to cool for 15 minutes so steam redistributes inside the crumb and prevents compression when slicing.
Extra technique, safety notes and details when you want to go deeper.
More tips & details
The Secrets to Achieving Golden Edges and an Airy Crumb
A High-Hydration Approach for Reliable No-Knead Success
This preparation adapts the core structural principles found in our guide for homemade bread into a flat, olive-oil enriched dough that develops its strength without any intensive kneading. This variation is designed to solve a common challenge for home bakers: achieving those iconic large bubbles and crispy, fried edges without the need for professional mixers or complex shaping techniques.
Instead of relying on physical labor, this dough utilizes a high-hydration fermentation method that allows the gluten to develop naturally during resting periods. As the flour absorbs the water, the protein strands align on their own to trap the gases produced by the yeast. The result is a surface marked by deep dimples and an interior filled with beautiful, irregular air pockets. This approach makes authentic, bakery-style results accessible for beginners while delivering the rich flavor and light texture expected from traditional Italian bread.
Texture Indicators of Properly Fermented Focaccia
When fermentation progresses correctly, the dough provides clear visual signals before it ever hits the oven. The surface should appear slightly domed and feel soft to the touch; if you apply gentle pressure, the indentation should slowly spring back. These signs confirm that the gluten network is strong enough to hold those precious gases, ensuring the bread doesn't turn out dense.
During the bake, the heat turns that trapped moisture into steam, rapidly expanding the air pockets. The olive oil pooled in the dimples and along the pan edges helps conduct heat, essentially shallow-frying the dough to create a thin, golden crust. A successful bake is defined by:
- Large, irregular air pockets visible throughout the interior.
- Golden, crispy edges with a distinct crunch.
- A soft, elastic crumb that feels light rather than heavy.
How High-Hydration Dough Changes the Structure
The defining feature of this recipe is the high ratio of water to flour. In the world of bread, hydration is what dictates how much the dough can stretch. When the hydration is high, the gluten strands can expand more easily, allowing the yeast to create much larger pockets of air.
This is why the dough may look loose and sticky before baking, but transforms into a remarkably airy crumb in the oven. The addition of olive oil further softens the texture by coating the gluten strands, keeping the bread moist and tender. Because the dough is spread flat in a pan rather than shaped into a loaf, it is encouraged to expand horizontally, which helps form that signature dimpled surface.
Serving Context and Finishing Characteristics
Once out of the oven, the focaccia needs to cool just long enough for the internal structure to set while the exterior stays crisp. Slicing is best when the bread reaches an internal temperature of roughly 105–115 °F (40–45 °C); this prevents the crumb from compressing or feeling gummy. You should see small pools of olive oil still glistening in the dimples, while the bottom offers a delicate crunch.
This style of bread is incredibly versatile in a Mediterranean kitchen:
- Served warm alongside grilled vegetables or fresh seafood.
- Used as a rustic sandwich base when sliced horizontally.
- Cut into square pieces and served as an appetizer with extra virgin olive oil.
The open structure of the crumb is perfect for soaking up sauces and oils while still maintaining its shape and bite.
Chef PEKIS Recommendations
Patience is your most important ingredient; allow the dough to ferment until you see active bubbles on the surface, or the interior will be dense. It is also vital to fully preheat your oven, as that initial burst of high heat is what creates the large cavities in the crumb. Finally, do not be shy with the olive oil in the pan—the oil is what "fries" the sides of the dough to give you those professional, crispy edges.
Storage and Reheating
This bread is at its absolute best within the first 24 hours, stored at room temperature in a breathable container or wrapped loosely in parchment paper. I do not recommend refrigerating it, as the cold environment will cause the starches to firm up and make the bread go stale faster.
If you have leftovers, you can freeze the focaccia for up to two months once it has cooled completely. To refresh it, place the slices in a 355 °F (180 °C) oven for about 6–8 minutes. This will bring back the crunch of the edges and reactivate the oils for a "just-baked" flavor. Avoid using a microwave, as it will make the crust tough and cause the airy crumb to collapse.
Served Warm from the Tray
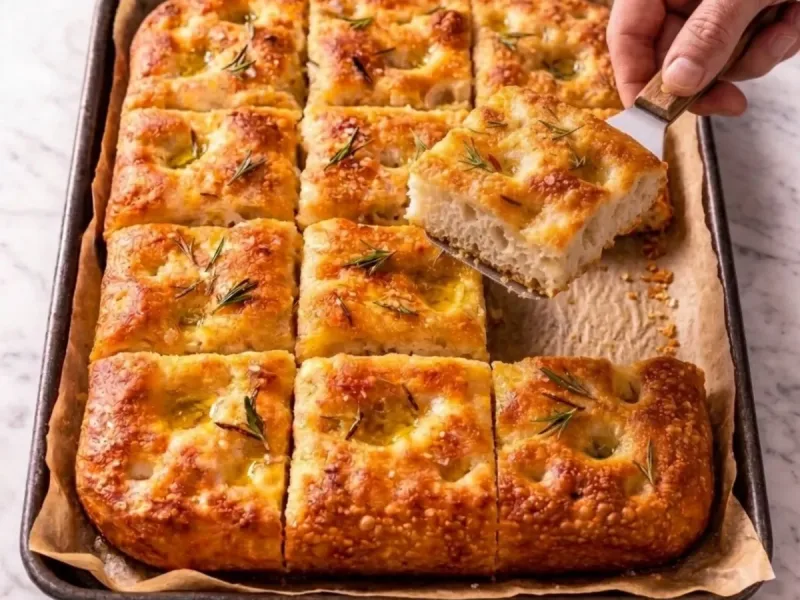
Italian focaccia appears as a tray-baked bread, a flat preparation with olive oil worked directly into the dough rather than shaped as a traditional loaf. When a piece is lifted, the interior reveals open pockets and a thin base that bends slightly before tearing. The first noticeable cue is the golden crust, lightly crisp at the edges while the center remains tender. That contrast defines the eating moment. A square portion breaks cleanly with the fingers and carries the scent of baked wheat and herbs.
Placed on the table while still warm, the surface retains small pools of olive oil in the dimples. These pockets soften the crumb and give each bite a gentle sheen without making the bread greasy. The crumb stays flexible rather than brittle, showing irregular air gaps that compress slightly and then spring back. This balance between crisp exterior and soft interior makes the bread easy to tear and share across the table.
Casual Table Moments
A tray of freshly cut squares fits naturally into informal meals where bread is meant to be passed rather than plated. Pieces are often arranged on a wooden board or left in the baking tray, allowing diners to take a portion while the center remains warm. The texture stays stable for the first serving window, when the edges still offer a slight crunch and the interior releases a warm olive oil aroma.
Later servings carry a different quality. As the bread settles, the crumb becomes slightly more elastic while the crust softens just enough to fold without cracking. That shift works well when the pieces accompany simple foods such as cured meats, grilled vegetables, or a bowl of soup. In those moments the bread acts as a quiet base, holding its shape while absorbing flavors from the table.
Questions
Why did my Italian focaccia turn out dense instead of airy?
Dense Italian focaccia usually happens when the dough has not fermented long enough before baking. Proper yeast fermentation produces carbon dioxide that stretches the gluten network, creating large air pockets inside the bread. If the dough is baked too early, the crumb remains compact and heavy. A correctly fermented dough looks bubbly, feels soft, and jiggles slightly when the pan is moved. Chef’s tip: Wait until small gas bubbles appear across the dough surface before dimpling; that visual cue confirms fermentation strength.
Can I make Italian focaccia with all-purpose flour instead of bread flour?
Yes, Italian focaccia works with all-purpose flour, but the crumb will be slightly less open. Bread flour contains more protein, which strengthens gluten formation and helps the dough hold large air pockets during baking. With all-purpose flour, the dough may spread more and produce smaller holes. The dough should still feel elastic and slightly sticky before the second rise. Chef’s tip: Add one extra stretch-and-fold during fermentation to improve gluten strength when using all-purpose flour.
Why does my Italian focaccia stick to the pan after baking?
Italian focaccia sticks when the pan is not coated with enough olive oil before baking. Olive oil forms a protective layer that prevents the dough from bonding to the hot metal surface. Without enough oil, moisture evaporates and the bottom crust adheres to the pan. Properly baked focaccia releases easily once the edges turn deep golden and crisp. Chef’s tip: Coat the entire pan with about 1 tbsp olive oil (15 ml) and make sure the surface looks glossy before adding the dough.
Why do the dimples disappear in my Italian focaccia during baking?
Dimples disappear when they are not pressed deeply enough before baking. During oven spring, expanding gases push the dough upward and flatten shallow indentations. Proper dimples should reach close to the pan surface so they remain visible after baking. Correct focaccia keeps small oil-filled pockets across the surface once baked. Chef’s tip: Press fingertips firmly until you feel the pan base beneath the dough.
Why are the edges of my Italian focaccia not crispy?
Soft edges usually mean the oven temperature is too low or the pan lacked enough olive oil. High heat triggers Maillard browning and rapid steam expansion, which creates crisp edges and a golden crust. Baking at 430°F (220°C) ensures proper crust formation. The focaccia is ready when the edges look deep golden and the bottom sounds hollow when tapped. Chef’s tip: Preheat the oven for at least 20 minutes so the pan enters a fully heated oven.
Recivelle · /recipe/authentic-italian-focaccia-bread-recipe